![[Previous (Tournament Structure)]](SECON 1999 Hardware Contest How to Make a Horse_files/previous-fancy.gif)
![[Home]](SECON 1999 Hardware Contest How to Make a Horse_files/home-fancy.gif)
IEEE SouthEastCON 1999
Hardware Design Contest

... Poems are made by fools like me,
But only God can make a tree.
~Joyce Kilmer
| Materials List |
Note: The GB male connectors can be found at Lowe's Home Centers and the Color Place paint is a gentle euphemism for Wal-Mart brand paint.
| Instructions |
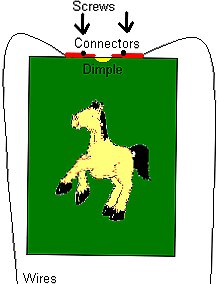
Cut 4x4 to a length of 5" (12.7 cm for those in the metric system.)
Paint with forest green spray enamel (verde foresta for those speaking Spanish.)
Drill a 5/8" hole 1/8" deep in the center of one end.
Remove the insulation from a male connector, insert one end of a 12" length of wire into the barrel and solder. Repeat.
Drill a 5/64" hole 5/16" from the leading edge of the male connector.
Position the connector to one side either right or left of the hole perpendicular to the side of the block allowing 1/16" of the connector to extend past the edge of the hole. Using a no. 2x3/8" brass screw secure the connector in place. Repeat for the opposite side.

Now the ball bearing should act as a switch with the switch closed when the ball bearing is present and open when the ball bearing is removed.
Use small sharp scissors or craft knife to cut out horse design.
Load a sponge brush with decoupage medium and thoroughly coat the back of the cutout, paying close attention to the edges. Be careful not to tear the design.
Moisten area for design with sponge and lay the glued print on the moistened area.
Smooth design. Allow to dry overnight.
Apply two coats of varnish or decoupage medium, letting dry between coats. Allow to dry overnight before handling.
Snap the dual mini board into two single mini boards. Score the board down the fourth row of holes with a knife and snap along scored line. This results in a 1 3/4" X 3/4" mini board with three rows of holes.
Place the LED on the board with the anode in the second hole of the middle row of holes. Solder in place. Three holes down from the cathode, solder the 10 ohm resistor in place.
Connect the cathode of the LED to the first lead of the resistor.
Connect a 12" length of 22 gauge wire to the anode of the LED. Connect a 12" length of 22 gauge wire to the trailing lead of the resistor.
Choose one side of the block (with a horse on it) parallel to the direction the connectors lay. This is the front. (Why? Because I said so. Why? Ask your mother.) Mark a line one inch from the right edge of the front and measure 4" from the bottom. This is the location for the IR LED.
Insert a screw into the boards mounting hole and slip the length of straw over the screw. Attach the board to the face of the horse with the LED at the 4" position facing away from the pavilion. Tighten until the straw begins to bend. Cover the screwhead with black electrical tape.
written by Ben Jones...