Debian Wheezy Install
Date July 2013
This is my install notes for my latest server, I wanted to document Everything I did (since I have not really done so for the last 3 servers).
This is also my first attempt at a SATA Raid 1 configuration in linux, so I wanted to document those steps as well.
The install is being done on a Dell Optiplex 760 Tower Computer, with 2x2TB SATA HDD (2GB Memory, DVD drive, DVD -RW DL drive and the on board graphics).
I have copied the websites I used (below) and added notes
The I downloaded the Debian 7.1.0-amd64 ('wheezy') net install disk from the Debian Distribution Website. Direct link to download image.
Index
How to Setup Software Raid in Debian / Ubuntu
Software Initial Install
Copy Grub to Other Raid Disk (corrected Version)
Folding@home install
After Installation
Additional Software Package Installations
Network / SSL / APACHE2 Setup
Moving Wordpress Blogs
Installing most recent jpgraph
How to start Galleon
HeyU (X10) Control Notes
68HC1x Compiler
Automatic Backups
CUPS Printer Server Setup
Win7 Printer Setup to use CUPS Server
Install Problems and Resolutions
libmodbus (Replacing FieldTalk Libraries on older servers)
Creating Application Launcher in GNOME3 Desktop
Raid Instructions and notes
Debian Jessie Install notes (7/2015)
How to Setup Software RAID in Debian / Ubuntu
From: IPRobot.Net
My comments are in red, all other notes in this section from the website above
Images taken from webpage, NOT from install, so there are small differences between the below and the actual display.
This time around, I will show you how to configure the software
RAID using Debian. This also can be applied to Ubuntu system as their
are based on Debian platform anyway. As I mentioned earlier, the
Software RAID configuration can be quite troublesome and time consuming,
but at least it is reliable and save a lot of cost when buying a
hardware RAID instead.
For a normal installation of Debian or Ubuntu, you can refer to the
links below for initial steps until the hard disk partitioning:
http://www.iprobot.net/linux-tutorial/how-to-install-linux-debian
http://www.iprobot.net/linux-tutorial/how-to-install-linux-ubuntu
Please make sure before this installation, you will need 2 identical
hard disk with same space connected to the server. But the truth is, you
don’t need to same hard disk with the same space amount, but as long as
you partitioned the space equally then it would be good as well. But
for beginner, it is better to get a hard disk that got the same space
quantity, less percentage that you would get yourself confused.
Below are the steps on how to configure the Software RAID:
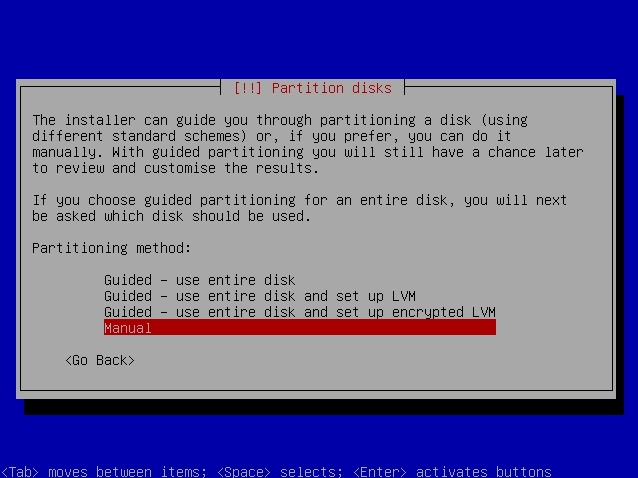
1) Select the Manual for the Partitioning Method:
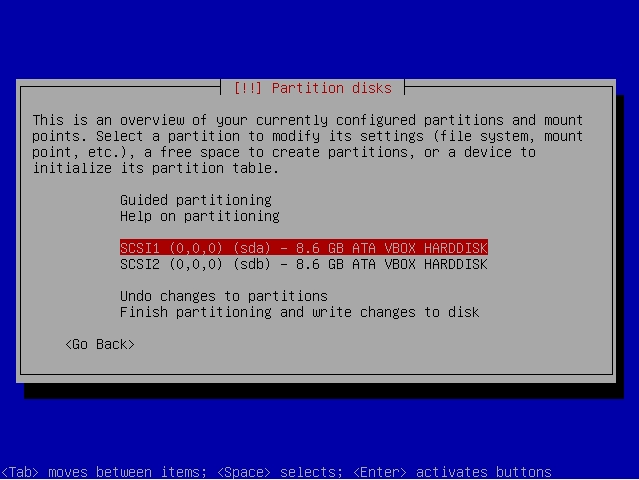
2) On this screen, it will show you the available hard disk for the
installation. Make sure both hard disks are visible. Now select the
first hard disk and hit Enter:
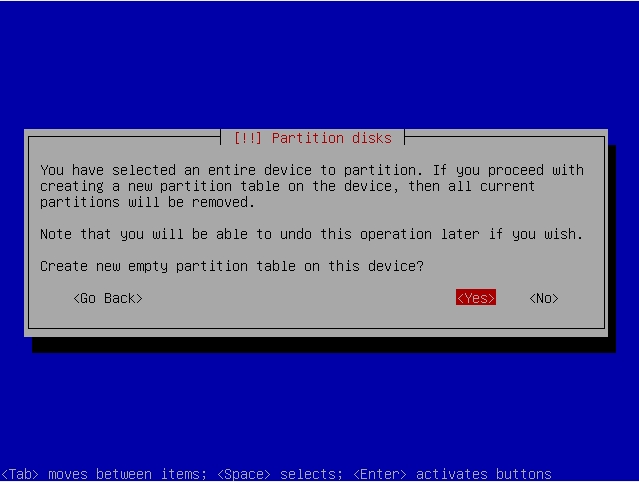
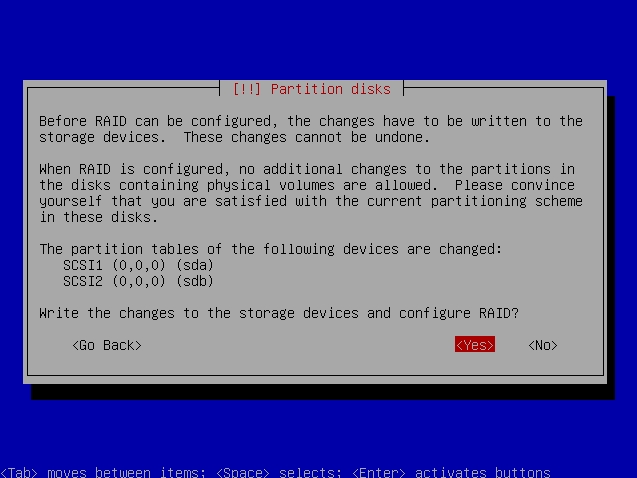
3) A message will warns you that you are about to create a new
partition that will destroy any existing partition. Choose Yes to
proceed:
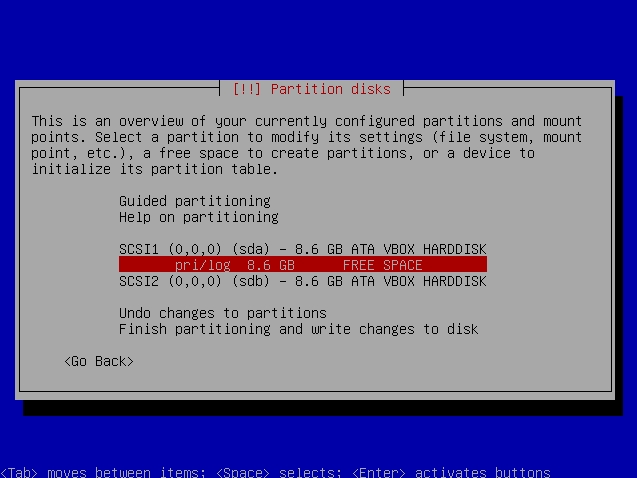
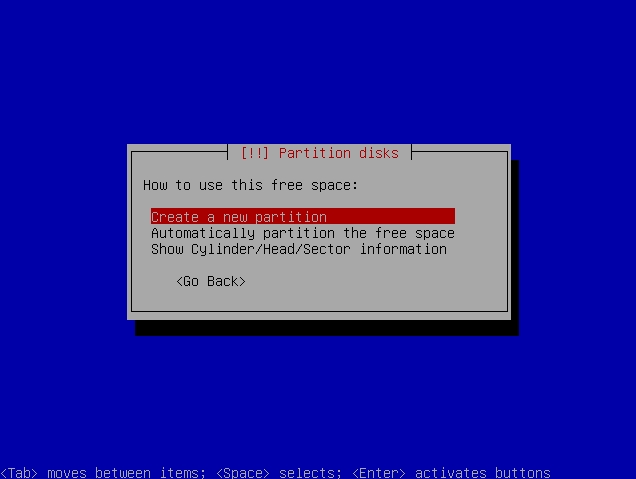
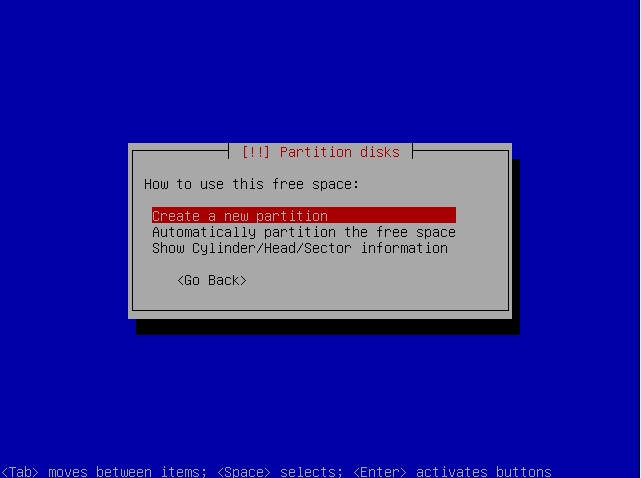
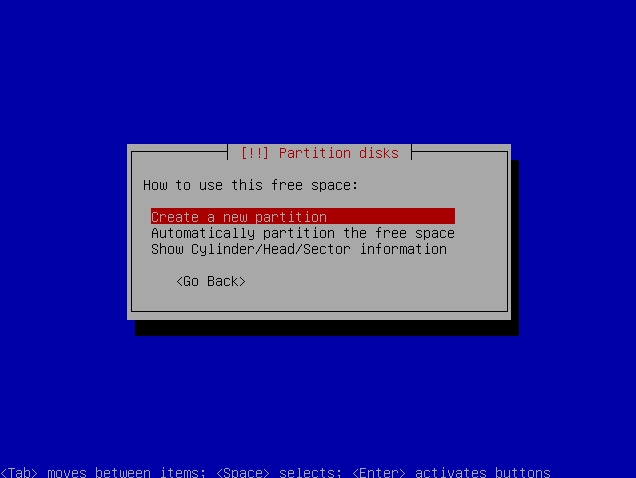
4) You will noticed that it will create a new partition at the bottom of the hard disk. Choose the new partition and hit Enter:
5) Select the Create New Partition:
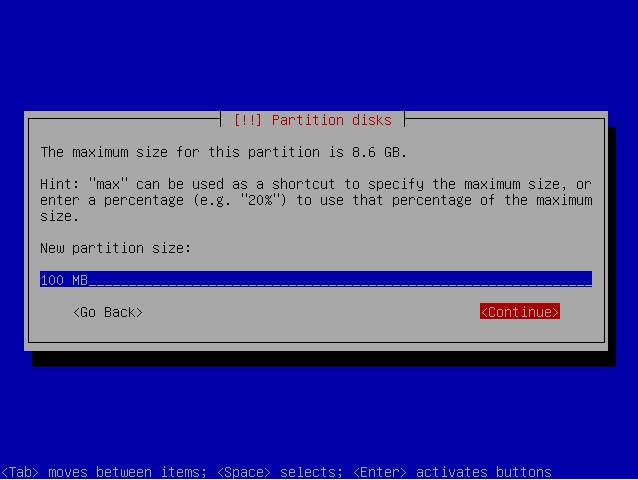
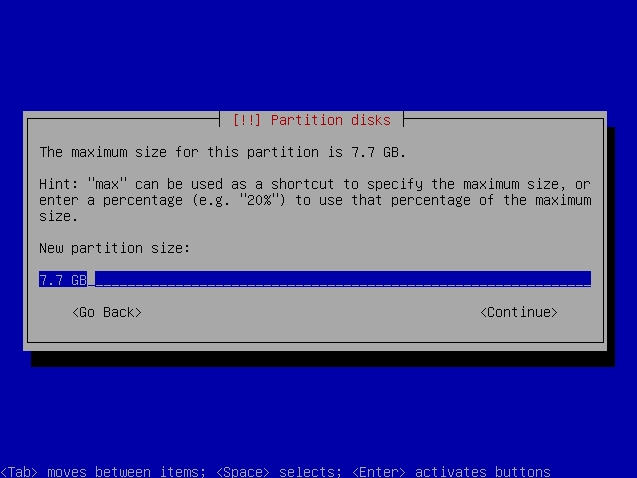
6) Since we are creating the partition for boot, just type 100 MB in the line:
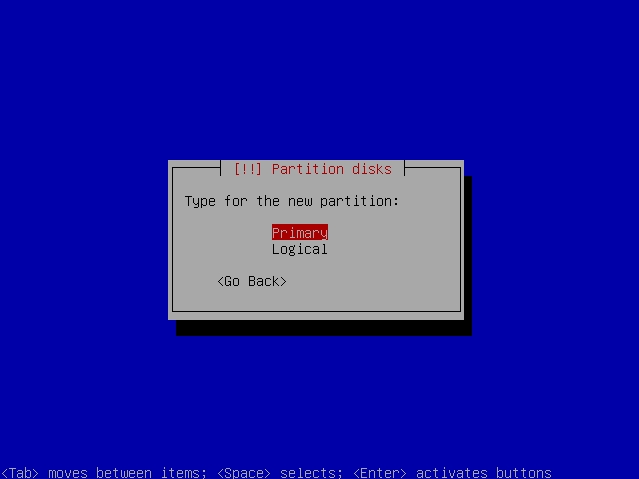
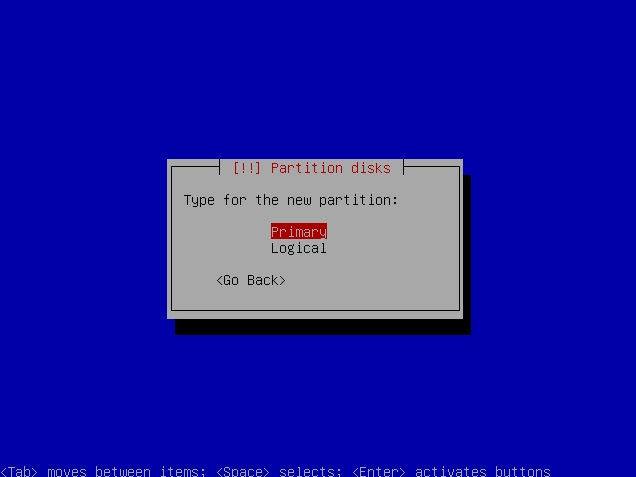
7) Choose the Primary partition:

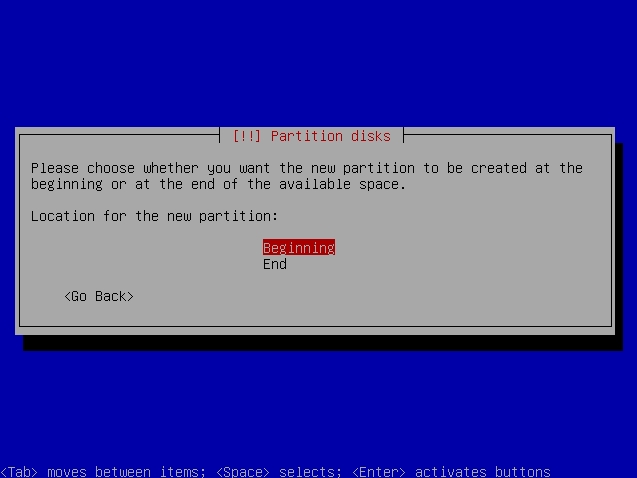
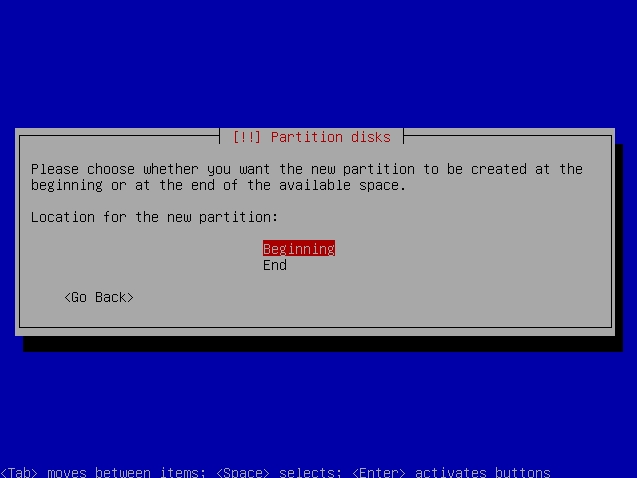
8 ) Choose to create new partition at the Beginning of the space:
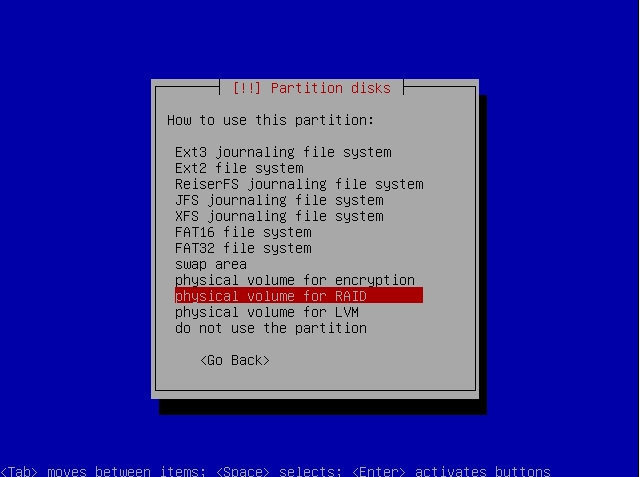
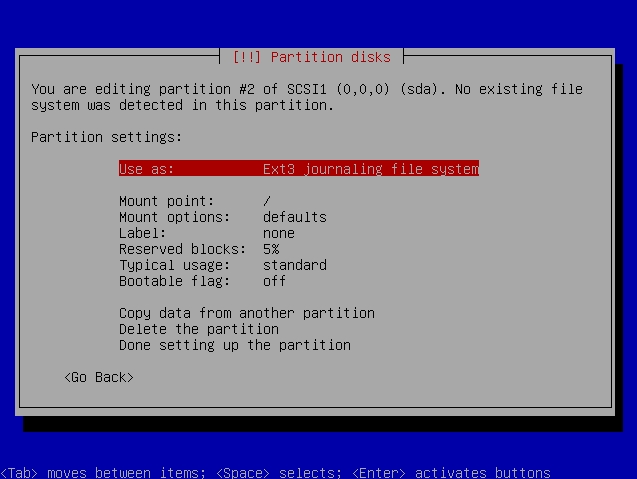
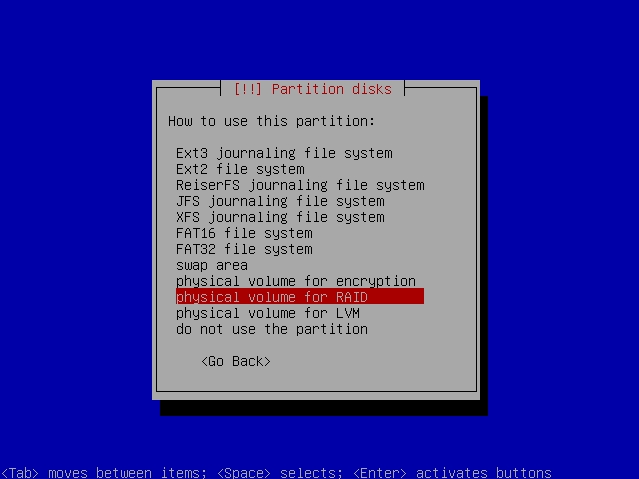
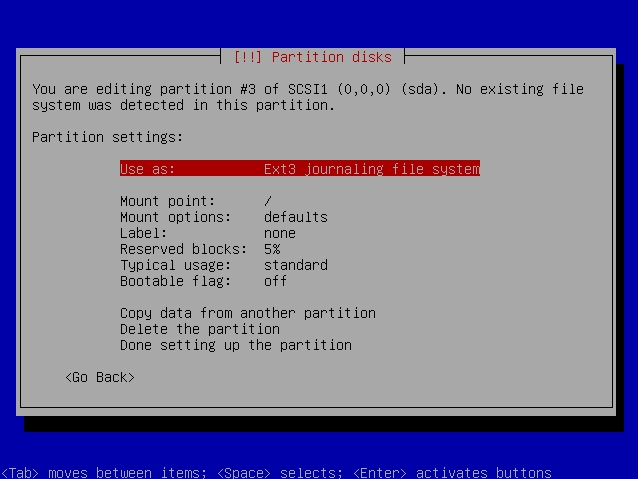
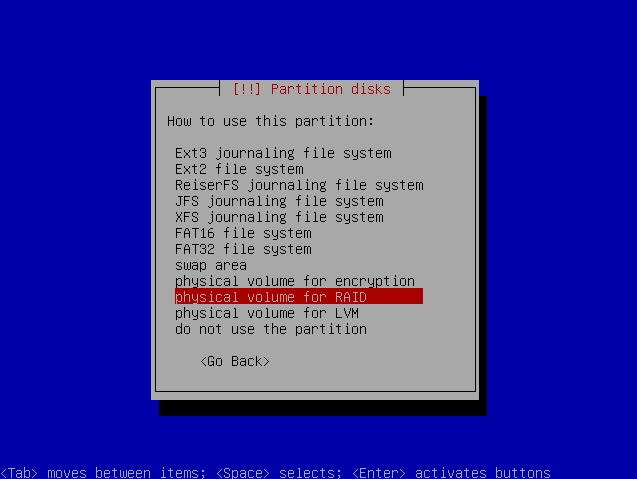
9) On this screen, move you selector to Use As and hit Enter:
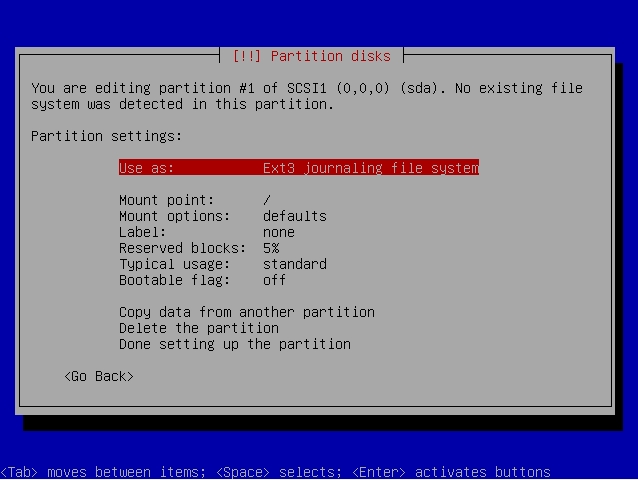
10) Please choose the Physical Volume For RAID option:
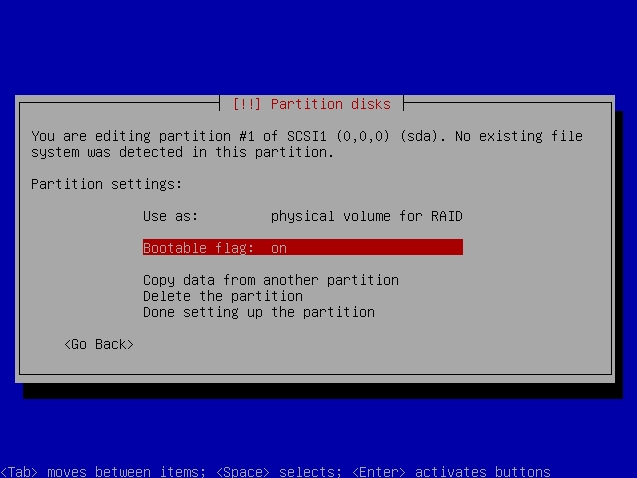
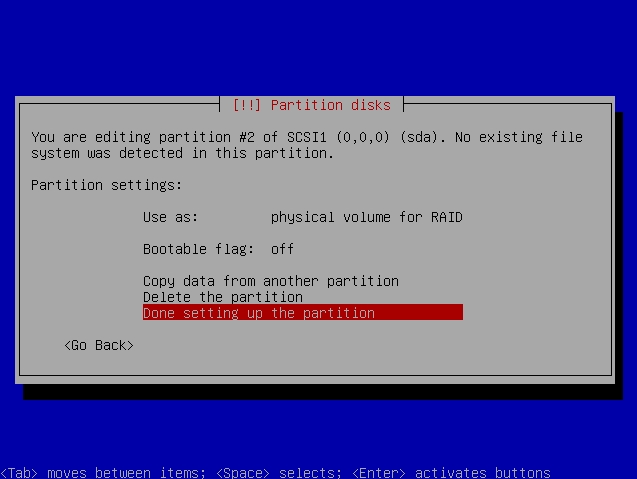
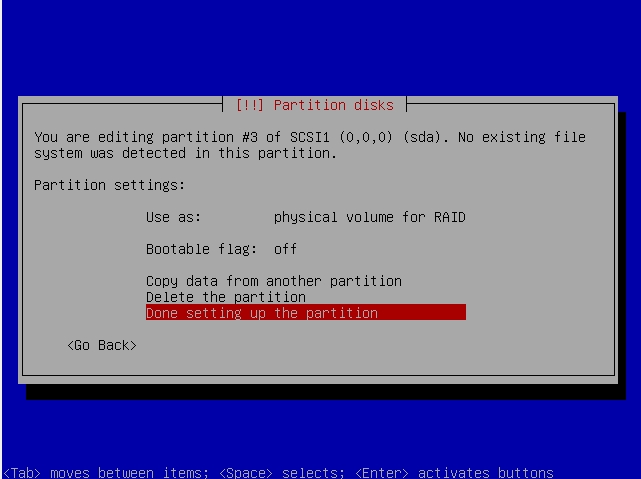
11) Please make sure that the Bootable Flag is tuned On:
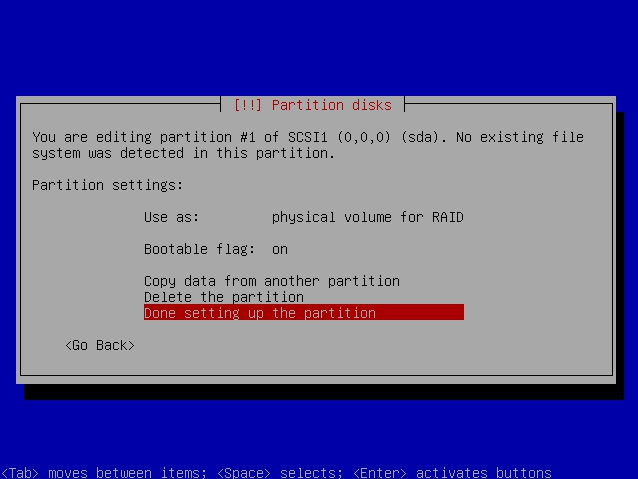
12) Choose the Done Setting Up The Partition to save the new partition:
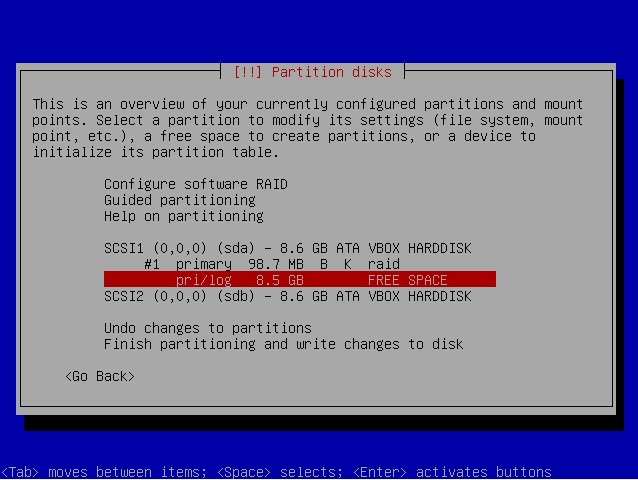
13) You will be taken back to the first screen. Next is to choose the next free space and hit Enter:
14) Select the Create A New Partition:
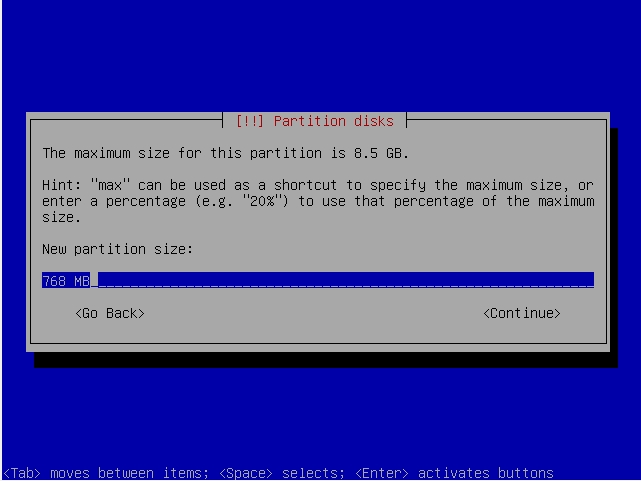
15) Now we are adding the new partition for the Swap. Please take
note that always make sure that the Swap size is double the amount than
your physical RAM. Since my physical RAM was only 384MB, so my swap size
should be set as 768 MB in the box:
16) Select the Primary option:
17) Select the Beginning option:
18 ) On the next screen, move your selector to the Use As and hit Enter:
19) Select the Physical Volume For RAID option:
20) After that, just straight away select the Done Setting Up The Partition to complete:
21) Back to the original screen, select the another free partition again and hit Enter:
22) Select the Create A New Partition option:
23) Now we are creating the partition for root. So just use all the leftover hard disk space:
24) Select the Primary option:
25) Move the selector to Use As and hit Enter:
26) Select the Physical Volume For RAID and hit Enter:
27) After that, just straight away choose the Done Setting Up The Partition:
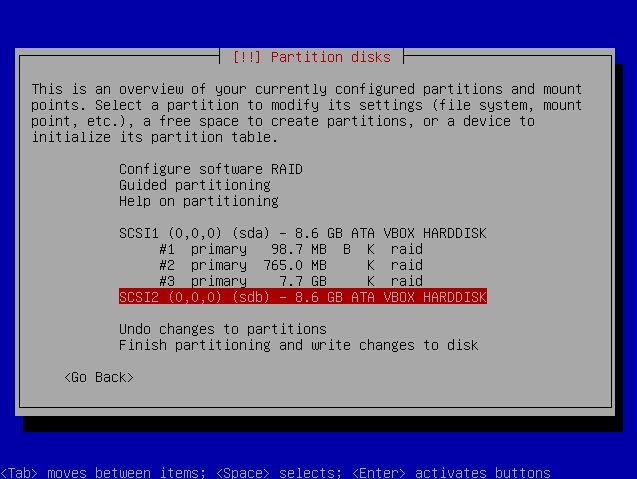
28) Now moving on to the second hard disk for the partitioning. Hit
Enter and please follow the Step 3 - 27 to do the same partitioning with
the 2nd hard disk:
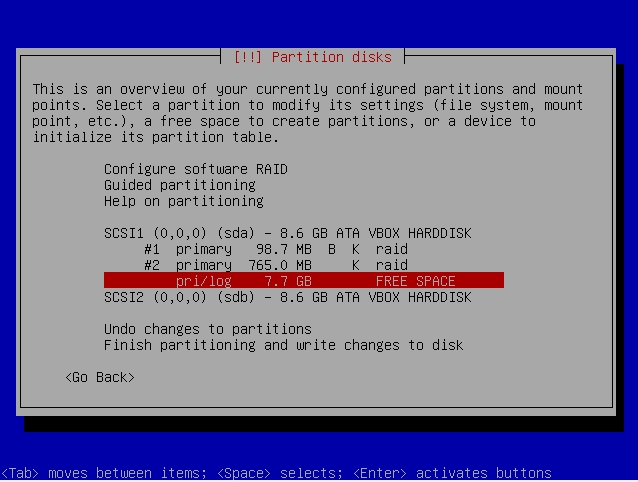
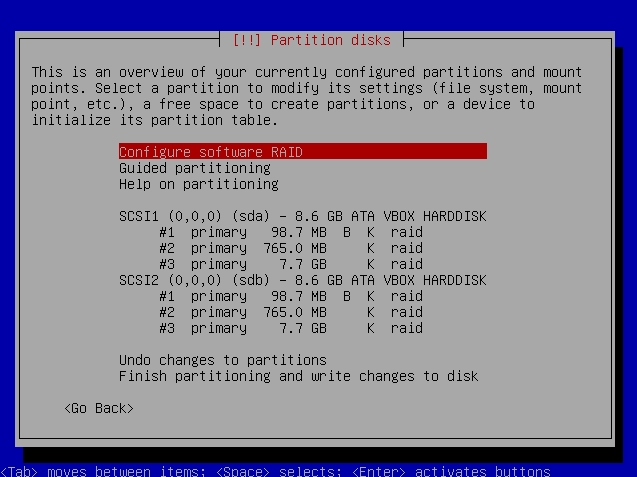
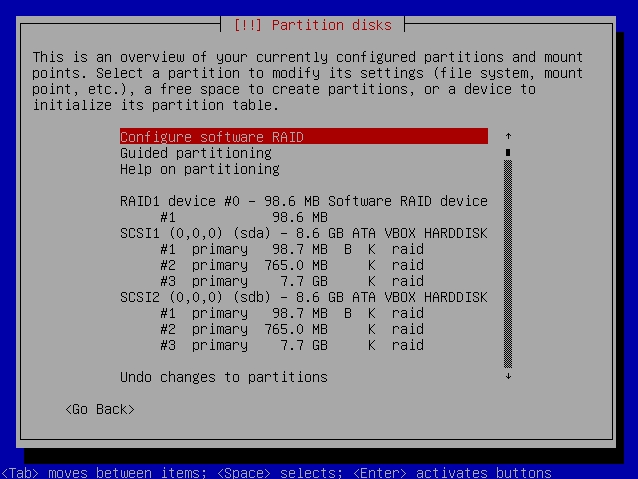
29) After the 2nd hard disk has been partitioned, the overall
partition configuration will look exactly like the bottom. Each space in
each partition will reflect to each other in the 2nd hard disk. So now
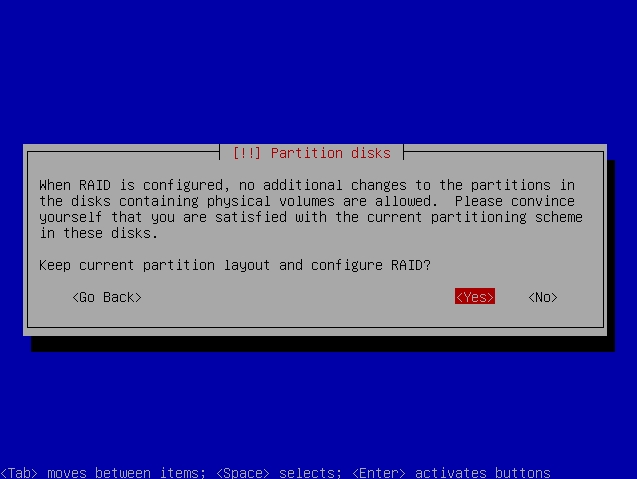
move the selector to Configure Software RAID and hit Enter:
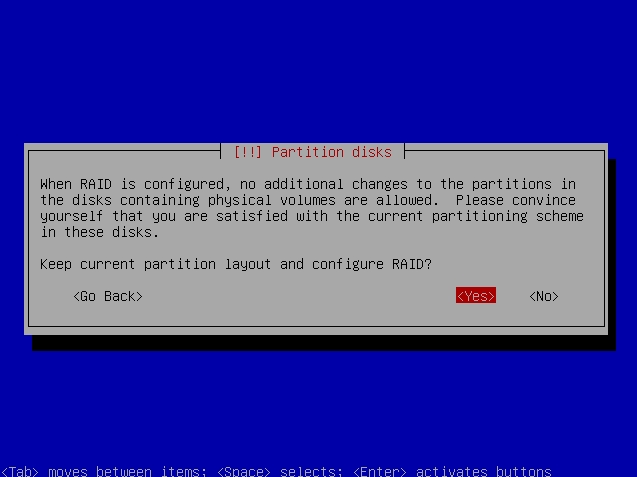
30) Select Yes to accept the new partition changes:
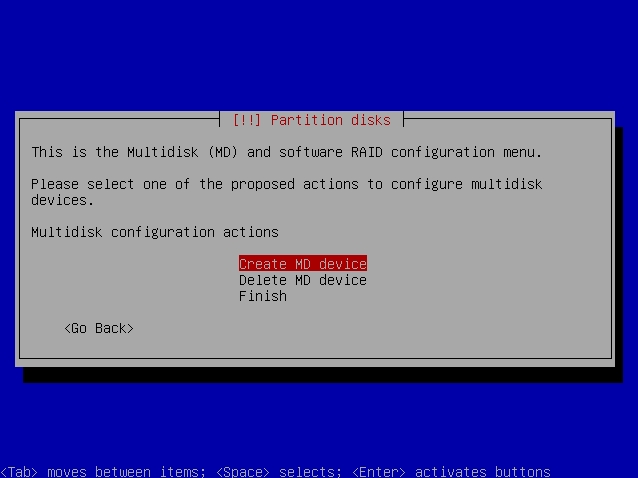
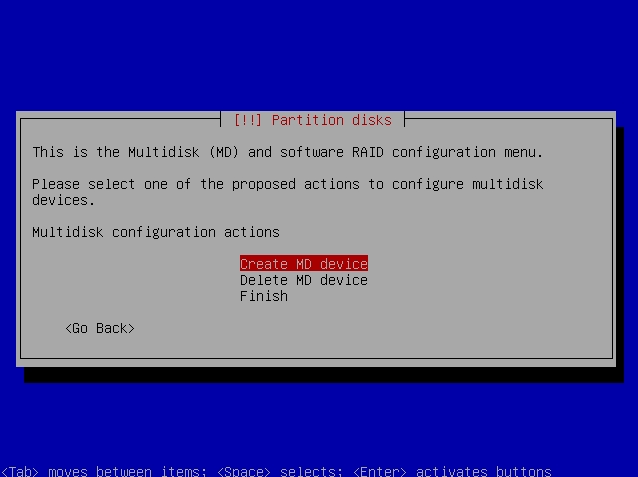
31) Now we will group the RAID hard disk. Select the Create MD Device option:
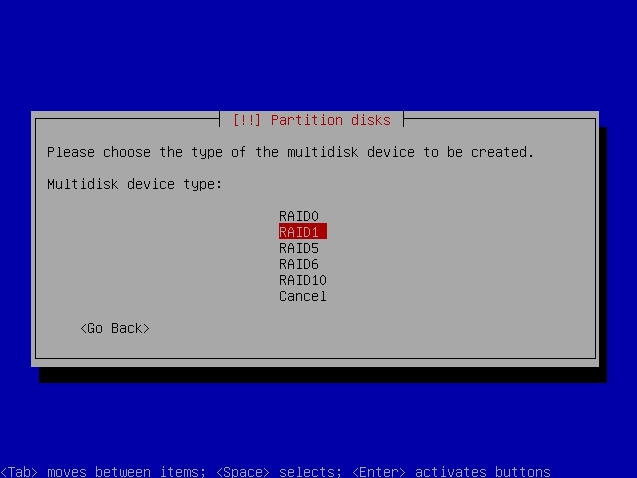
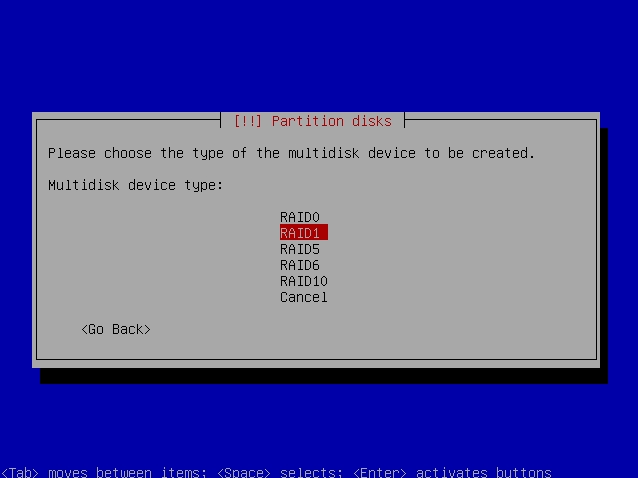
32) Choose your preferred RAID method. For now, we are going to choose RAID1:
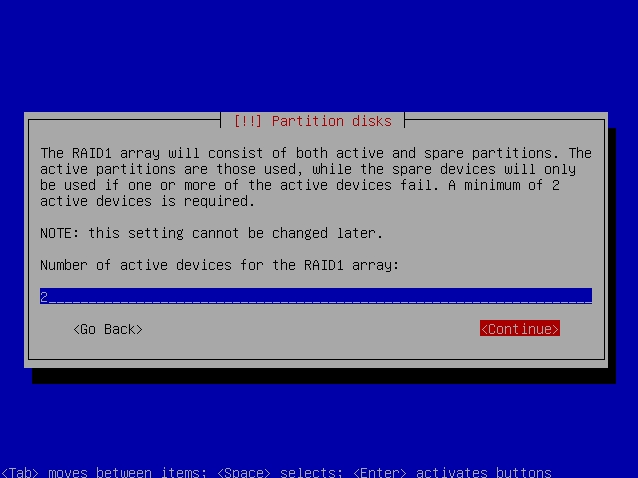
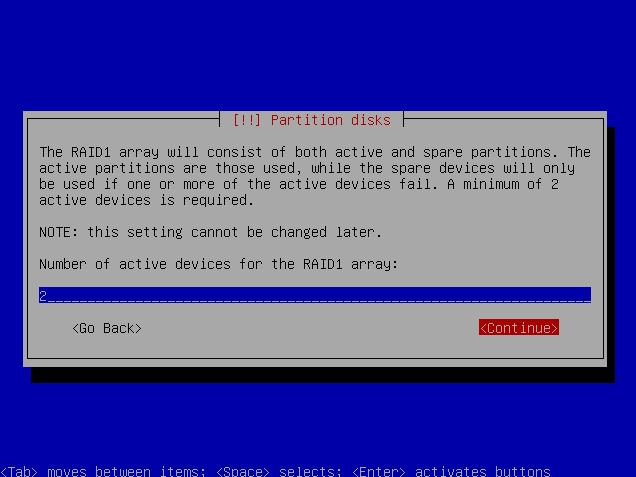
33) Just leave the default number 2 for the number of RAID devices.
This option may varies depending on which RAID type you selected:
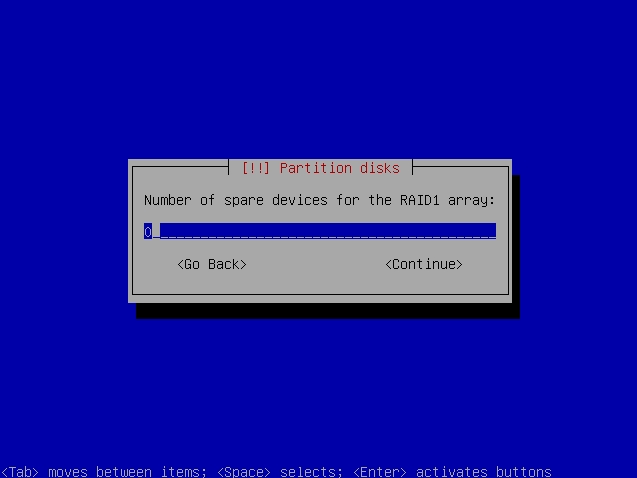
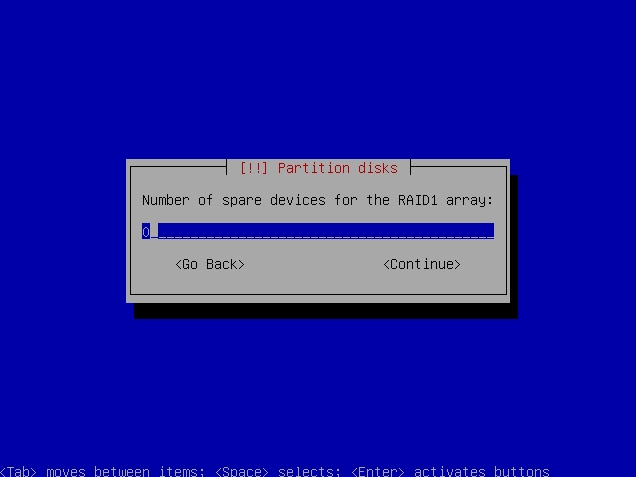
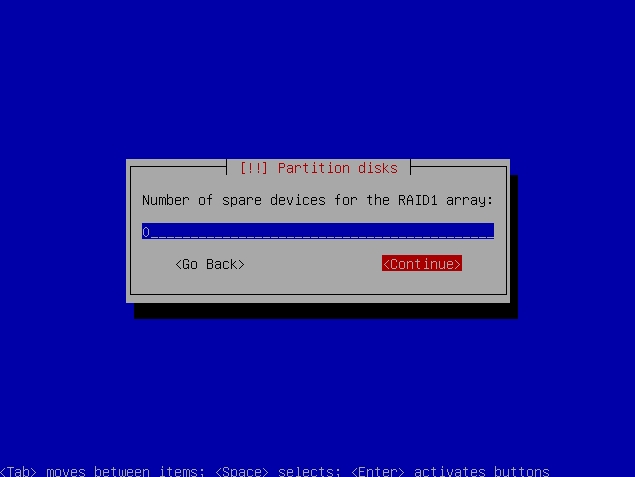
34) Just leave it zero if you don’t put up any spare hard disk for your RAID:
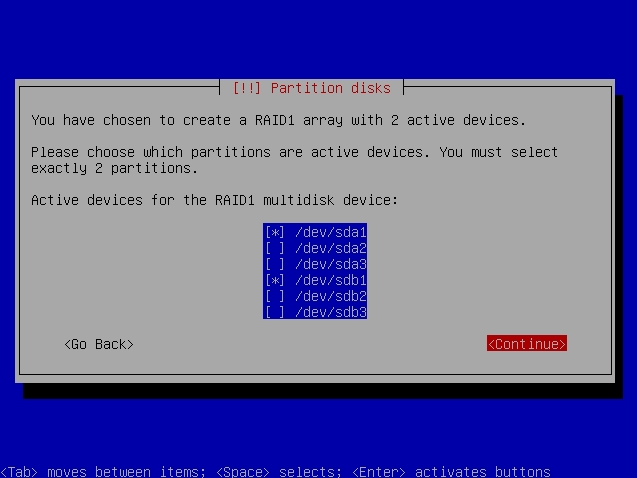
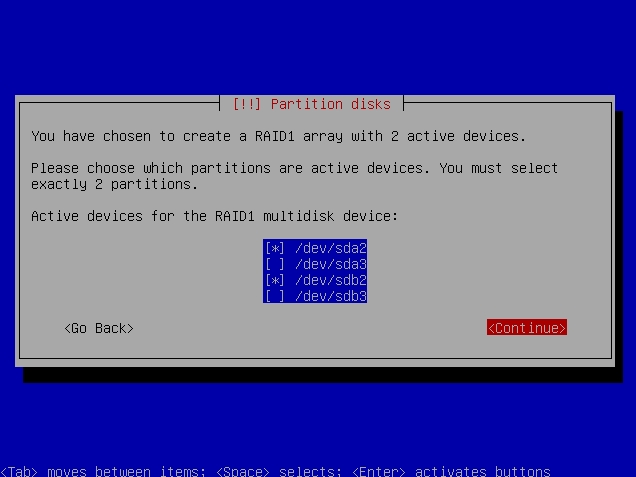
35) Now select the SDA1 and SDB1 as we are creating the RAID for /boot:
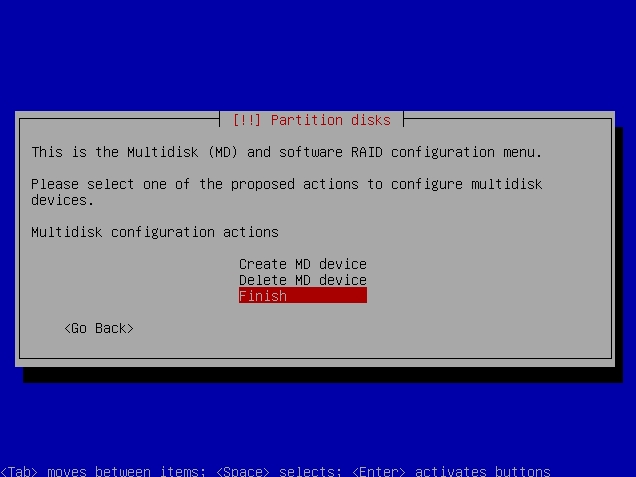
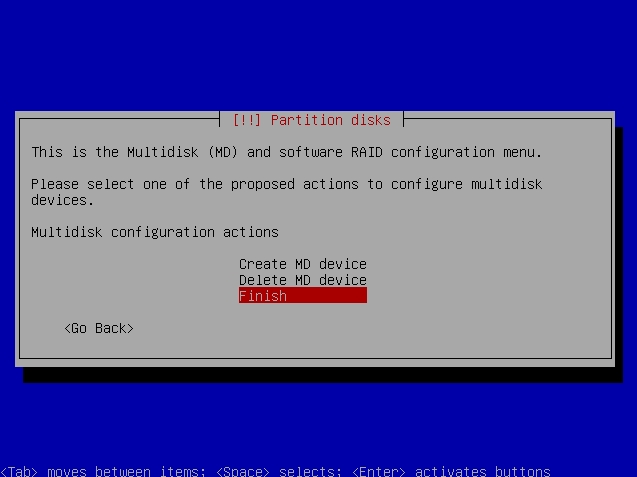
36) When it has been done, choose the Finish to save the new RAID partition:

37) Now we are proceeding with the 2nd RAID partition. Choose the Configure Software RAID and hit Enter:
38 ) Select Yes to proceed with the RAID configuration:
39) Choose the Create MD Device option:

40) Choose the RAID1 option:

41) Just leave the default value of 2 RAID active devices and proceed:

42) Leave the default value of zero for the RAID spare array unless you know what you are doing:
43) Now select the SDA2 and SDB2 for the Swap partition purposes:
44) Select the Finish to complete the setting for the Swap partition:
45) Now we proceed with the /root partition setup. Choose the Configure Software RAID and hit Enter:
46) Select Yes to proceed with the RAID partition setup:
47) Choose the Create MD Device option:
48) Choose the RAID1 setup:
49) Just leave the default value of 2 for the active RAID devices:
50) Leave the default value of zero for the spare RAID devices:
51) Now select the remaining partition for /root space which are SDA3 and SDB3:
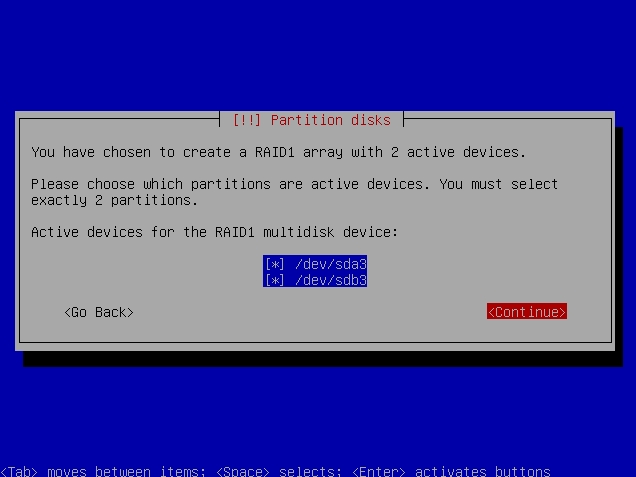
52) Soon after, just choose the Finish to complete the setup:
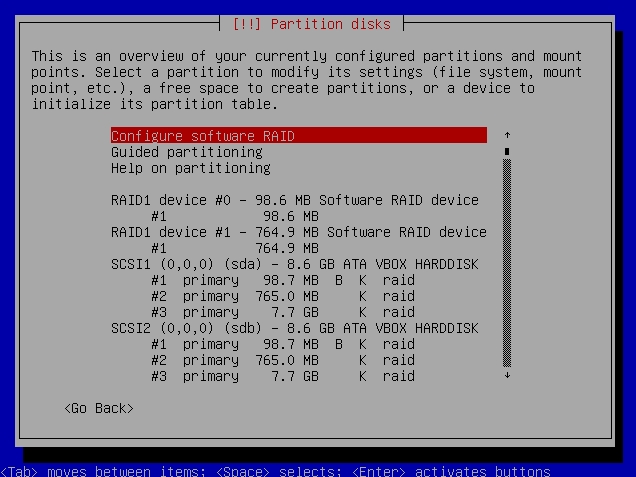
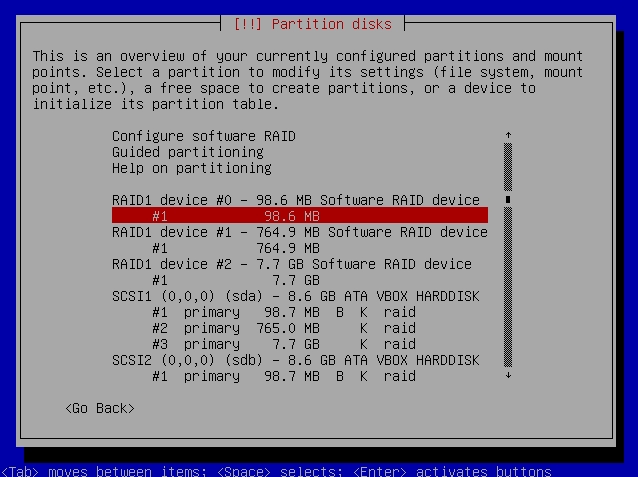
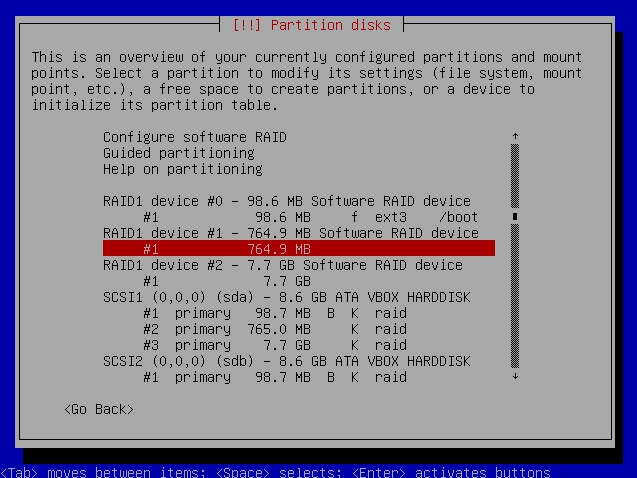
53) Now the initial software RAID is completed like the below
picture, what's left is to assign each RAID partition its role. Now
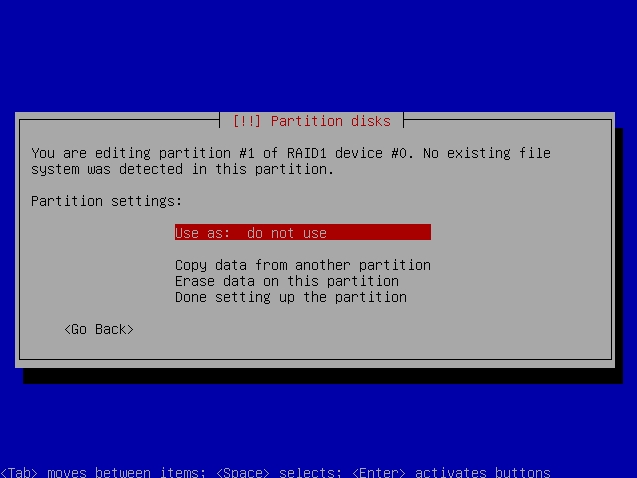
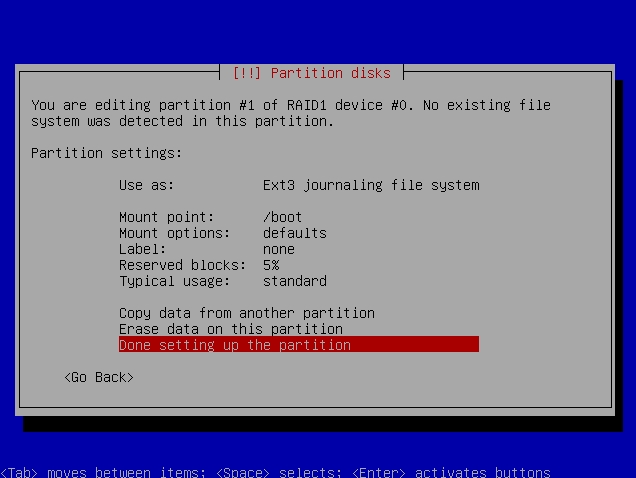
select the RAID partition Device #0 for /boot setup:
54) Choose the Use As and hit Enter:
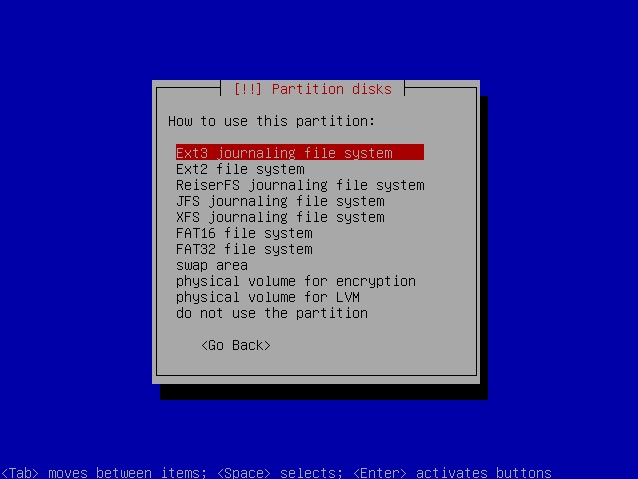
55) Choose the EXT3 Journaling File System (or EXT4 for Ubuntu) and hit Enter: (I did EXT4 for my Debian Install)
56) Now move the selector to the Mount Point and hit Enter:
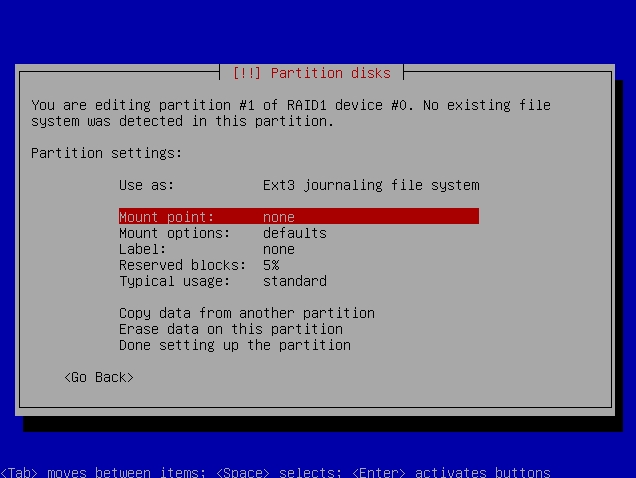
57) Now select the /boot and hit Enter:
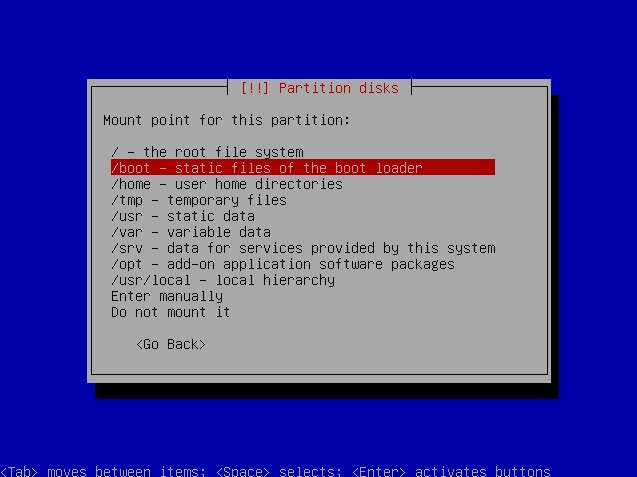
58) Select the Done Setting Up The Partition to complete the /boot partition setup:
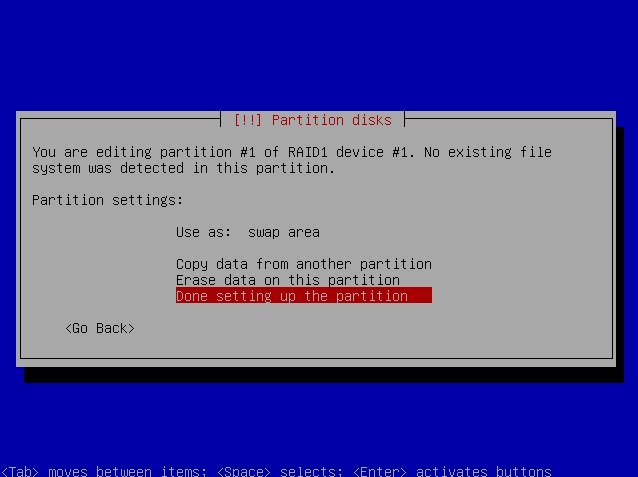
59) At the first screen again, now select the RAID Device #1 and hit Enter:
60) Move the selector to the Use As and hit Enter:
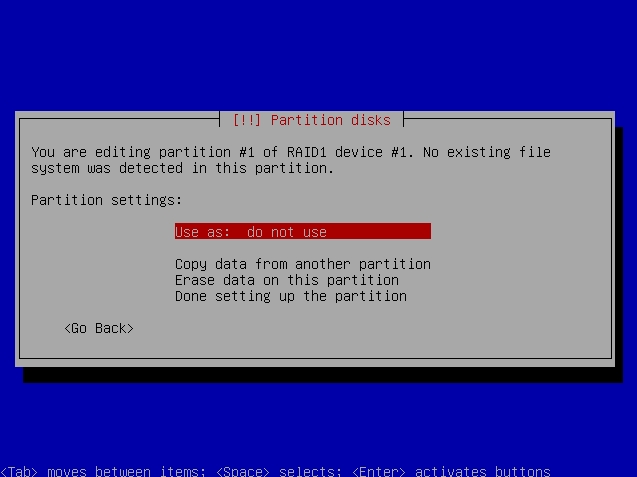
61) This time we are going to create a Swap partition for the operating system. So select the Swap Area and hit Enter:
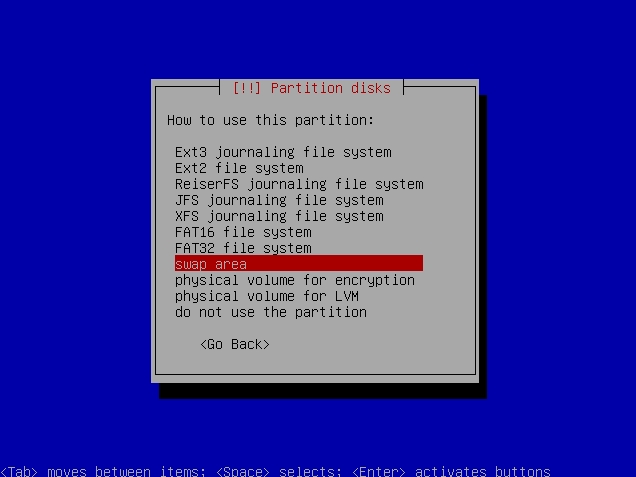
62) Just straight away select the Done Setting Up The Partition soon done:
63) Now is to edit the last partition of the RAID which is meant for /root. Select the RAID Device #2 and hit Enter:
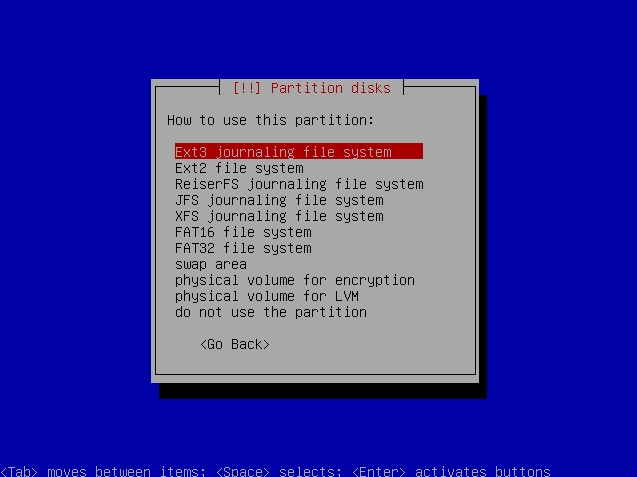
64) Move the selector to the Use As and hit Enter:

65) Select the EXT3 Journaling File System and hit Enter: (I did EXT4 for my Debian Install)
66) Now move the selector to the Mount Point and hit Enter:
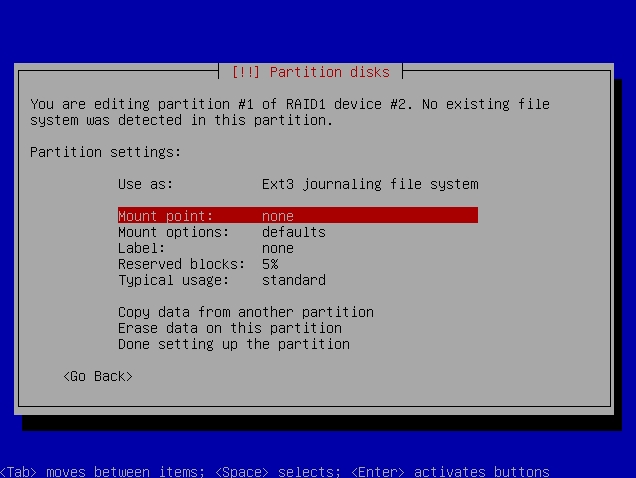
67) Select the / – The Root File System and hit the Enter:
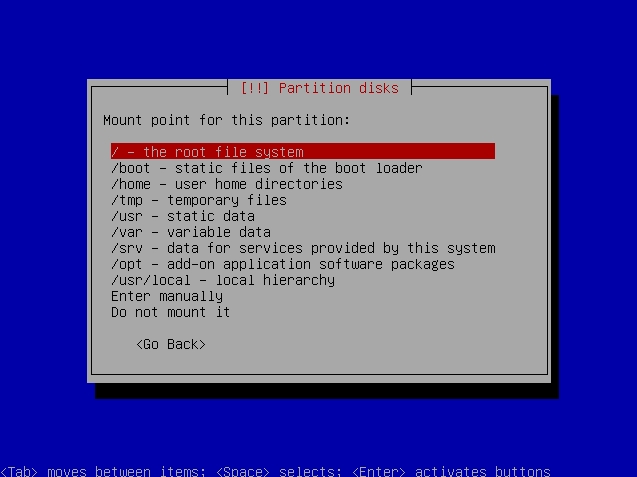
68) Finally select the Done Setting Up the Partition to complete the procedure:

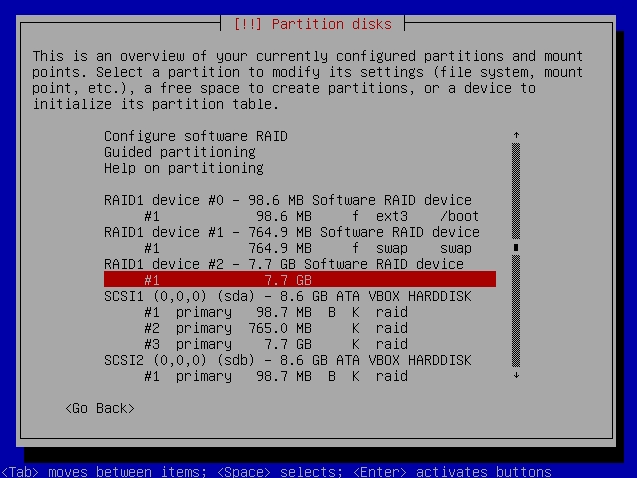
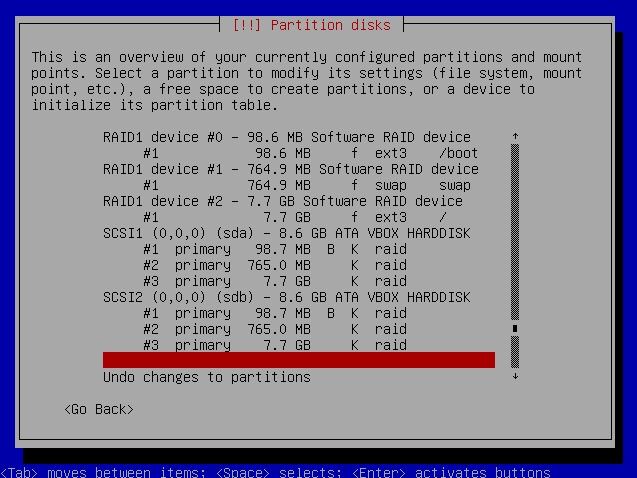
69) The final outlook of the partition should be like below. Once
confirmed, move the selector to the most bottom of the screen to select
the Finish Partitioning And Write Changes To Disk and hit enter:
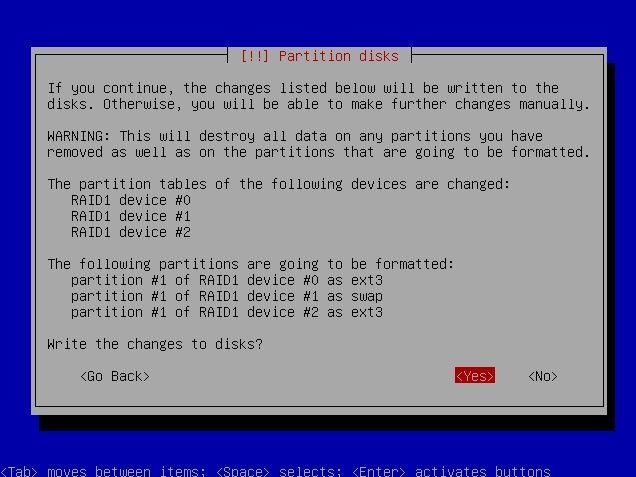
70) Just press Yes if you confirmed the partitions:
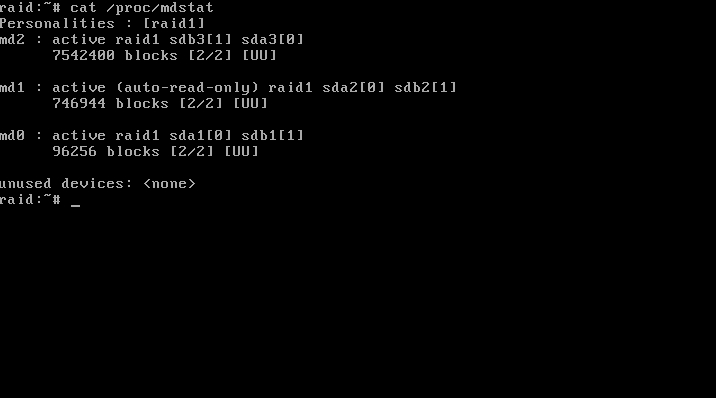
71) Then just follow the normal installation procedure. When the "Software Selection" page came up, I selected the following software to install: Debian Desktop Environment, Web Server, Print Server, SQL Database, SSH Server, Standard System Utilities. All other software remained unselected. Once the server has been rebooted, log in as root and type cat /proc/mdstat to view the RAID status:
72) By default, the GRUB boot loader only were installed in one of
the hard disk only. If you forgot this step, your second hard disk can’t
boot by itself. You need to copy the GRUB from the SDA to SDB. Just
type grub and follow like below, line by line:
device (hd0) /dev/sda
root (hd0,0)
setup (hd0)
device (hd1) /dev/sdb
root (hd1,0)
setup (hd1)
The above did NOT work for me, "grub" command line did not exist. I did find other "grub" commands and started researching. Found another web site for installing software Raid (similar to the instructions above), but they included the correct instructions. Those notes are included HERE
73) For Ubuntu users version 9.10 and above, the system will install
the boot loader in both partition during setup as long as you enabled
the Boot from Degraded Disk option.
74) Please take note that the software RAID will be running under
MDADM. This is a software that being developed to handle the RAID
procedure inside the server. You can type mdadm -help for further information
The server's software RAID should be running fine now. Happy trying
Correct Grub Bootloader Instructions
From: .pQd's log
after the reboot / and swap [in my case] already is mounted from the
RAID1 spanning both physical drives but i have to install manually grub
on the 2nd drive so the system can boot even if the first disk is
physically removed:
root@debian:~
Installation finished. No error reported.
|
and voilá - the system will boot up even if the first drive gets physically removed.
status of all raids can be checked by:
root@debian:~# cat /proc/mdstat
Personalities : [raid1]
md1 : active (auto-read-only) raid1 sda3[0] sdb3[1]
1260480 blocks super 1.2 [2/2] [UU]
md0 : active raid1 sdb2[1]
2927552 blocks super 1.2 [2/1] [_U]
unused devices: <none>
|
status of single mdX device:
root@debian:~# mdadm --detail /dev/md0
/dev/md0:
Version : 1.2
Creation Time : Sun Apr 28 12:03:26 2013
Raid Level : raid1
Array Size : 2927552 (2.79 GiB 3.00 GB)
Used Dev Size : 2927552 (2.79 GiB 3.00 GB)
Raid Devices : 2
Total Devices : 1
Persistence : Superblock is persistent
Update Time : Sun Apr 28 12:34:09 2013
State : clean, degraded
Active Devices : 1
Working Devices : 1
Failed Devices : 0
Spare Devices : 0
Name : debian:0 (local to host debian)
UUID : 9ebb319c:b0463e21:4d852665:f6527d33
Events : 75
Number Major Minor RaidDevice State
0
 0
0
0      removed
1
 8
18
1      active sync   /dev/sdb2
|
to re-add disk removed earlier for a while:
root@debian:~# mdadm -a /dev/md0 /dev/sda2
mdadm: added /dev/sda2
root@debian:~# mdadm -a /dev/md1 /dev/sda3
mdadm: added /dev/sda3
|
to force a consistency check on a single mdX device:
echo check > /sys/block/md0/md/sync_action
|
to clone partition setup from one disk to another [for instance when new blank drive was installed replacing failed disk] i use gdisk:
#sgdisk is part of debians gdisk package. it's available for squeeze via backports
#partition data from sda will be copied to sdb
sgdisk -R=/dev/sdb /dev/sda
|
after that repeat for all mdX:
mdadm -a /dev/md0 /dev/sdb2
|
and after a while of syncing it’s done.
side notes:
- RAID1 is not a replacement for scheduled and monitored backups – it’ll not save any information in case of accidental delete
- BIOS of the computer has to be configured with both drives added to
the ‘boot order’ so the OS can be loaded even if the first disk is gone
- disk swapping has to be done with the power off. i’ve tried to
simulate hdd failure by disconnecting a running drive while the system
was running – all my attempts ended with the OS crash.
- grub-install /dev/sdb should be repeated whenever there’s update of grub / kernel
Folding@Home Install
from: Folding@home Website - Linux Install Guide
I tried the express installation from website, but it drove both processors to 100%, but the control panel did not indicate that FAH was running but was "updating". tried to shut it down with /etc/init.d/FAHClient stop but it refused to shutdown. did a system shutdown, but it wouldn't shutdown (stoped at.......guess what.....Folding@home not shutting down). Uninstalled FAH and then did a manual (see below). I did NOT install the fahviewer. (I kept some of the other FAH notes in this section for latter reference (how to restart, file locations, etc)
- Terminal installation for Debian / Mint / Ubuntu
- Terminal installation for RedHat / CentOS / Fedora
- File Locations
- Command Line Only Options
- Table of Options
- How to Uninstall V7
- Install Guide Updates
- I found a better way to install the V7 client, where can I make a suggestion?
Terminal installation for Debian / Mint / Ubuntu
Download the installation package files; 64-bit versions shown.
If using an i386/i686 32-bit OS version, download those files as
appropriate from the client download - other platforms page.
https://fah-web.stanford.edu/file-releases/beta/release/fahclient/debian-testing-64bit/v7.2/fahclient_7.2.9_amd64.deb
 wget --no-check-certificate https://fah-web.stanford.edu/file-releases/beta/release/fahclient/debian-testing-64bit/v7.2/fahclient_7.2.9_amd64.deb
 wget --no-check-certificate https://fah-web.stanford.edu/file-releases/beta/release/fahcontrol/debian-testing-64bit/v7.2/fahcontrol_7.2.9-1_all.deb
 wget --no-check-certificate https://fah-web.stanford.edu/file-releases/beta/release/fahviewer/debian-testing-64bit/v7.2/fahviewer_7.2.9_amd64.deb
Install the FAHClient.
sudo dpkg -i --force-depends fahclient_7.2.9_amd64.deb
The package will prompt for initial setup information, user name, etc. Enter information or change as needed, and click OK.
Install the FAHControl.
sudo dpkg -i --force-depends fahcontrol_7.2.9-1_all.deb
Optionally, install the FAHViewer.
sudo dpkg -i --force-depends fahviewer_7.2.9_amd64.deb
Done. The FAHClient is installed and running as a service. Manage, monitor and update settings using the FAHControl.
Terminal installation for RedHat / CentOS / Fedora
Download the installation package files; 64-bit versions shown.
If using an i386/i686 32-bit OS version, download those files as
appropriate from the client download - other platforms page.
 wget --no-check-certificate https://fah-web.stanford.edu/file-releases/beta/release/fahclient/centos-5.3-64bit/v7.2/fahclient-7.2.9-1.x86_64.rpm
 wget --no-check-certificate https://fah-web.stanford.edu/file-releases/beta/release/fahcontrol/centos-5.3-64bit/v7.2/fahcontrol-7.2.9-1.noarch.rpm
 wget --no-check-certificate https://fah-web.stanford.edu/file-releases/beta/release/fahviewer/centos-5.3-64bit/v7.2/fahviewer-7.2.9-1.x86_64.rpm
Install the FAHClient.
rpm -i --nodeps fahclient-7.2.9-1.x86_64.rpm
Note: Fedora / Red Hat .rpm
packages do not support prompting for setup information. Instead, the
client is set to pause on start so initial setup information may be
entered through the FAHControl interface.
Install the FAHControl.
rpm -i --nodeps fahcontrol-7.2.9-1.noarch.rpm
Optionally, install the FAHViewer.
rpm -i --nodeps fahviewer-7.2.9-1.x86_64.rpm
Done. The FAHClient is installed and is ready
to run as a service. Open FAHControl, enter user information, then
unpause the client. Manage, monitor and update settings as needed.
File Locations
The cores, logs, and work folder, plus current log file, are located here:
/var/lib/fahclient
The config.xml file is located here:
/etc/fahclient
The FAHClient is started and stopped via the service script in /etc/init.d/FAHClient.
 sudo /etc/init.d/FAHClient start
 sudo /etc/init.d/FAHClient stop
Command Line Only Options
There are three options for running the FAHClient in Linux:
- Run as a system service. This
is the recommended and default option. The FAHClient service is
installed automatically via the installer package, and will start at
boot. Then control and configure the FAHClient with FAHControl. Note
that FAHControl will not start or stop the FAHClient process. This setup
uses /etc/fahclient/config.xml and runs in /var/lib/fahclient/. Do not run FAHClient directly when the service is running.
- Run from FAHControl. Disable
the service using the appropriate commands or through the
administration interface. This enables running the FAHClient via
FAHControl. This is similar to how FAHControl runs FAHClient in Windows.
You must enable autostarting of the local FAHClient in FAHControl. In
this case the FAHClient will run in ~/.FAHClient/ and use a client.xml from that location.
- Run from command line.
Alternately, with the service disabled, it is possible to run the
FAHClient manually from the command line in a directory of your choice.
FAHClient will run in the current directory and use a config.xml from
the same directory.
1. and 3. can be headless if choosing not to use FAHControl. The FAHClient can be configured for remote access by editing /etc/fahclient/config.xml. The FAHClient is started and stopped via the service script in /etc/init.d/FAHClient.
 sudo /etc/init.d/FAHClient start
 sudo /etc/init.d/FAHClient stop
Services are started and stopped by root but the
client will automatically drop root privileges when run this way. It
runs in the restricted fahclient account for added security. Starting
and stopping the service is however, not at all necessary if when using
FAHControl. Instead pause/unpause the FAHClient. When paused the
FAHClient should idle in the background using negligible resources.
The plain command line only FAHClient tarball is available for download here.
Note: There is no install guide or
support in the forum for this type of expert only installation. The only
support for command-line only installs is this:
 Documentation:
 ./FAHClient --help

 Configuration using config.xml:
 ./FAHClient --configure

 Configuration with no config file (minimum flags):
./FAHClient --user=Anonymous --team=0 --passkey=1385yourpasskeyhere5924 --gpu=false --smp=true
How to Uninstall V7
This section describes how to uninstall V7 FAH application.
Please let the current Work Unit finish and upload (using "Finish"). Exit the FAHControl application.
Open a terminal window. Enter the command appropriate for your version of Linux:
Ubuntu:
sudo dpkg -P fahclient
Fedora:
su -c 'yum remove fahclient'
Press Enter.
Enter password when prompted.
Press Enter.
Repeat for the fahcontrol and fahviewer packages if also installed.
Uninstall is complete.
After Install Notes
SSH Modifications
Edit file /etc/init.d/sshd.conf using a text editor. Find line that says PermitRootLogin yes and change "yes" to "no" to disable the ability to ssh into the system and log into root directly (must go though su or sudo). Requires a restart - /etc/init.d/ssh restart.
Apache public_html access & setup
The following will allow access to users public_html directories:
cd /etc/apache2/mods-enabled
ln -s ../mods-available/userdir.conf userdir.conf
ln -s ../mods-available/userdir.load userdir.load
We also need to allow the use of .htaccess files (ie for website logins), so while still in the same directory do the following:
ln -s ../mods-available/rewrite.load rewrite.load
Restart apache2 so new mods take affect
/etc/init.d/apache2 restart
Additional Software Packages
Using Synaptic Package Manager (from desktop) install the following packages:
thunar - File manager (not functional after install - only icon generated is to setup thunar, never to start it?)
webalizer - Keeps stats on website access
- After install, edit /etc/webalizer/webalizer.conf. Search for line #Incremental no and remove '#' and change 'no' to 'yes'.
mysql-server - relational database
At this point is was noted that, unlike previous installs, this install did NOT include php.
php5 - HTML Embedded scripting language
Restarted apache2, but php still non-functional.
Modified /etc/apache2/mods-enabled/php5.conf because the file said 'running PHP scripts in user directories is disabled by default'. Commented out section below:
<ifModule mod_userdir.c>
<Directory /home/*/public_html>
php_admin_value engine off
</Directory>
<ifModule>
Restarted apache2. Works! (note: needed to clear buffer on browser before it worked)
phpmyadmin - MySql web administration tool
rsync - Fast, versatile, remote (and local) file-copying tool (to be used to copy files off of old server)
required installs for ssh updates for Wordpress (from: HERE):
libssh2-1-dev - ssh2 client side library
libssh2-php - php bindings for libssh2
php-pear - PEAR PHP Extension and Application Repository
to test do the following
php -m |grep ssh2
it should return 'ssh2'
end section
g++ - GNU C++ Compiler
binutils-m68hc1x - Binary utilities that support Motorola's 68HC11/12 targets
gcc-m68hc1x - GNU C compilier for the Motorola 68HC11/12 processors
newlib-m68hc1x - newlib C library (Motorola 68HC11/12)
gdb - GNU Debugger
make - Utility for Directing Compilation
libphp-jpgraph - Object oriented graph library for php5 <-see HERE
libphp-jpgraph-examples - examples for above <-see HERE
minicom - communications program
tree - displays directory tree
easytag - viewing, editing and writing ID3 tags (in MP3 files)
wireshark - Network traffic analyser
fail2ban - ban hosts that cause multiple authentication errors
libapache2-mod-perl2 - perl modules for apache (needed for gradewatch
ffmpeg - multimedia player, server, encoder and transcoder (see notes on video scripts)
Ensure gcj is NOT installed (was on previous installs, not in wheezy)
atftp - advanced TFTP Client (used for cisco experimentation)
atftpd - advanced TFTP Server (used for cisco experimentation)
the TFTP directory is /srv/tftp
Networking / SSL / APACHE2 SETUP
Set up static IP
From: HERE
edit file /etc/network/interfaces
change the following section:
# The primary network interface
allow-hotplug eth0
iface eth0 inet dhcp
Make it read:
# The primary network interface
auto eth0
iface eth0 inet static
address 192.168.0.51
gateway 192.168.0.1
netmask 255.255.255.0
network 192.168.0.0
broadcast 192.168.0.255

# OLD CONFIG
#allow-hotplug eth0
#iface eth0 inet dhcp
Create SSL Certificate
Generate a server key:
openssl genrsa -des3 -out server.key 4096
Output
Generating RSA private key, 4096 bit long modulus
............++
.......................................++
e is 65537 (0x10001)
Enter pass phrase for server.key:                     <-pass phrase typed here will be used thoughout procedure
Verifying - Enter pass phrase for server.key:
Create a certificate signing request
Originally from: Here (but link appears to be dead)
PDF Version
openssl req -new -key server.key -out server.csr
Output
Enter pass phrase for server.key:
You are about to be asked to enter information that will be incorporated
into your certificate request.
What you are about to enter is what is called a Distinguished Name or a DN.
There are quite a few fields but you can leave some blank
For some fields there will be a default value,
If you enter '.', the field will be left blank.
-----
Country Name (2 letter code) [AU]:US
State or Province Name (full name) [Some-State]:TN
Locality Name (eg, city) []:
Organization Name (eg, company) [Internet Widgits Pty Ltd]:UofM
Organizational Unit Name (eg, section) []:
Common Name (e.g. server FQDN or YOUR name) []:tech-uofm.info
Email Address []:

Please enter the following 'extra' attributes
to be sent with your certificate request
A challenge password []:
An optional company name []:
Now sign the certificate signing request
openssl x509 -req -days 365 -in server.csr -signkey server.key -out server.crt
Output
Signature ok
subject=/C=US/ST=TN/O=UofM/CN=tech-uofm.info
Getting Private key
Enter pass phrase for server.key:
Make a version of the server.key which doesn't need a password
openssl rsa -in server.key -out server.key.insecure
mv server.key server.key.secure
mv server.key.insecure server.key
now move it to the correct location for apache to use
mkdir /etc/apache2/ssl
mv server.crt /etc/apache2/ssl/
mv server.csr /etc/apache2/ssl/
mv server.key /etc/apache2/ssl/
mv server.key.secure /etc/apache2/ssl/
lastly enable the ssl apache modulescd /ete/apache2/mods-enabled
ln -s ../mods-available/ssl.* ./
Set up Apache2 sites
Copy the following files from the old server
they can be found in /etc/apache2/sites-available:
blog.dankohn.info     default
ceetusm.dankohn.info                   memphisfirstteams.org
dankohn.info	      default-ssl      ncatecit.dankohn.info
dankohn.info-ssl                       tech-uofm.info
and copy the files to the same directory on the new server (you might want to move the existing default files to a .bak file first)
in each file update the ip address as appropriate (in the case of the static ip setup above: 192.168.0.51)
now cd ../sites-enabled
now create a symbolic link to each of those files with ln -s ../sites-available/* ./
now mv default 000-default
now mv default-ssl 000-default-ssl
restart apache: /etc/init.d/apache2 restart
PHP.INI
edit the file /etc/php5/apache2/php.ini making the following changes:
change line upload_max_filesize = 2M change 2M to 20M
change line post_max_size = 2M change 8M to 12M
Gradewatch Setup
Copy the 2 files (gr_login.pl and gr_view.pl) in /var/www/cgi-bin to the same directory on the new server
ensure that the permissions are set correctly: chmod 755 *
go up one directory (to /var/www>
copy .htaccess file from old server to new server (this forces all sub directories to use https://
This file reads:
RewriteEngine On
RewriteCond %{HTTPS} off
RewriteRule (.*) https://%{HTTP_HOST}%{REQUEST_URI}
Set Up Send Mail
from: Nixtutor.com
install ssmtp
edit /etc/ssmtp/ssmtp.conf as follows:
#
# Config file for sSMTP sendmail
#
# The person who gets all mail for userids < 1000
# Make this empty to disable rewriting.
root=memphisfirstteams@gmail.com

# The place where the mail goes. The actual machine name is required no
# MX records are consulted. Commonly mailhosts are named mail.domain.com
mailhub=smtp.gmail.com:587

# Where will the mail seem to come from?
#rewriteDomain=

# The full hostname
hostname=memphisfirstteams@gmail.com

# Are users allowed to set their own From: address?
# YES - Allow the user to specify their own From: address
# NO - Use the system generated From: address
FromLineOverride=YES


#added by me
AuthUser=memphisfirstteams
AuthPass=passwordhere
UseSTARTTLS=YES
To test:
ssmtp someemail@email.com
To:someeemail@email.com
From:fromemail@email.com
Subject:Some Subject
Some text here
end with ctrl+d
Galleon Setup
copy the following files from old server downloads directory to new server (note newer java versions do not appear to work)
galleon-2.5.5-linux.zip
Download the latest version of java (1_7_0_25) run time environment (jre) tar.gz for Linux x64 from HERE
Download the latest version of java (1_7_0_25) development environment (jdk) tar.gz for Linux x64 from HERE
create a directory /usr/java
copy the two files to /usr/java
change to the /usr/java directory
untar the files with tar zxvf j*.tar.gz
now unzip the galleon-2.5.5-linux.zip using the command: unzip galleon-2.5.5-linux.zip -d galleon-2.5.5
cd galleon-2.5.5
make install
Galleon failed to start, gave error:
Starting Galleon TiVo Application Server...
./galleon: 1: eval: /usr/share/galleon/bin/./wrapper-linux-x86-32: not found
Found the following HERE
I just switched to the 64-bit version of Ubuntu 10.04 (Lucid Lynx) and so experienced this Galleon issue first hand. Here's how I got it to work (for anyone who might stumble across this thread in a search).

- installed Galleon normally *
- downloaded the 64-bit wrapper from here (http://wrapper.tanukisoftware.org/download/3.4.0/wrapper-linux-x86-64-3.4.0.tar.gz)
- copied the lib/wrapper.jar and lib/libwrapper.so files from the 64-bit wrapper archive into Galleon's lib directory
- removed the existing wrapper-3.2.3.jar file from Galleon's lib directory
- copied the bin/wrapper file from the 64-bit wrapper archive into Galleon's bin directory
- removed the existing wrapper-linux-x86-32 binary and renamed the new 64-bit wrapper to that name
- started up Galleon and it worked!
Seems to have started
In the past, I have had to disable IPv6. This seems to be fixed because the fix posted HERE apears to be in galleon 2.5.5
After trying for some time and not being able to download anything from any Tivo, I started to investigate. Found that their is a known bug that started on Feb 14, 2013. It seems that tivo's are sending expired cookies. Tivo Desktop (for PC) has a patch. Did some more digging and found that Galleon does to. See BLOG POST for details.
To do the galleon patch:
download the file galleon-fix-for-togo-expired-cookie.jar
rename the file to galleon.jar
put in /usr/share/galleon/lib directory
restart galleon with /etc/init.d/galleon restart
To Start Galleon
Log is as root
cd /usr/share/galleon/bin
PATH=/usr/java/jre1.5.0_17/bin:$PATH
/etc/init.d/galleon start (should be started on computer startup)
./gui.sh
Heyu
Heyu is an x10 control program that communicates via an CM11A Module. It is available from http://heyu.tanj.com/.
Download Heyu from the website
extract all the files
as a user (not root)
./Configure
make
su
make install (you will be asked 'Where would you like the simple Heyu configuration file installed'. I selected '3. in directory /etc/heyu (for system-wide access)
exit
heyu info
Heyu notes
heyu engine - start heyu daemon
heyu info - status of X10 Modules
heyu help - heyu help
heyu on HU - turn on unit (where H is the HOUSE Letter (eg 'A') and U is the unit number (eg '1') so command 'heyu on A1' would turn on unit A1
heyu off HU - same as above but turns unit off
heyu bright HU <1-22> - brightens light HU
heyu dim HU <1-22> - dims light HU
my current setup:
A1 Living Room
A2 Computer Room
A3 Bed Room
GCC for 68HC1x Microcontrollers
NOTES
Install: binutils-m68hc1x gcc-m68hc1x newlib-m68hc1x (already done - see above)
In the past, I have used GEL, but I have found that it is more confusing than helpful so I did NOT install it on this server.
I did add files for interrupt jump table access, fox11 LCD, Buffalo routine usage and port definitions, as well as the proper memory map.
To Compile:
m68hc11-gcc -nostartfiles -Wl,-m,m68hc11elfb -mshort -fomit-frame-pointer progname.c -I /home/uofm/public_html/upload/ /home/uofm/public_html/upload/buffalo.s /home/uofm/public_html/upload/fox11_lcd.s /home/uofm/public_html/upload/interrupts.c -o progname.o
m68hc11-objcopy -O srec progname.o progname.s19
m68hc11-objdump -S progname.o > progname.lst
Explanation of above:
The first line compiles the program along with support files. the parameters -nostartfiles -Wl,-m,m68hc11elfb -mshort -fomit-frame-pointer are ALL required. the -Wl,-m,m68hc11elfb defines the microcontroller to use, but also forces the compiler to look for a memory.x file (which defines the memory map of the development board being used). The line compiles the .c program to a .o file.
The second line creates the .s19 file that can be loaded to a 68HC11 development board.
The 3rd and final command generates a list file to help with debugging
Other Notes:
Help is available on the compiler via two separate commands:
m68hc11-gcc --help
m68hc11-gcc --target-help
Location of key files:
/usr/m68hc11/
/usr/bin/m68hc11*
/usr/lib/gcc-lib/m68hc11
Doc files(?):
/usr/share/doc/binutils-m68hc1x
/usr/share/doc/gcc-m68hc1x
/usr/share/doc/newlib-m68hc1x
System Transfer
first create all the accounts (users) on the new server
from the old server, transfer each account in turn using the following command:
rsync -e ssh -Cavub ./ acct@ip:/home/acct
where acc - account name
ip - ip address of new server
[example rsync -e ssh -Cavub ./ usm@192.168.0.106:/home/usm]
also rsync the /srv/tftp directory to the new server (dont forget to temporarily chown of the new server directory to a user account before initiating transfer
NOTE: rsync did not transfer some stored *.exe files, had to transfer via alternate methodes
I did NOT transfer usfirst, myblog and mymusic in this fashion (see below for info on setting up those accounts).
music
copy the music/Music directory to new server using rsync
install latest version of TinCan Jukebox from Here (note: I had to use IE to download, firefox and iceweasel (linux browser) would not download file)
from the install.txt file:
  To Install:
    -extract the tarball into your web directory where you want it (like your www base directory).
        tar -xzf tinCanJukebox.tar.gz
            (Note, this will create a subdirectory called tincanjukebox in your current directory.  If that directory already exists (update mode)
            this will overrwrite all files except those you've added and the lib/conf.php)
    -create a new mysql catalog schema using mysql administrator or cmd line mysql
    -create a new mysql user and give them full priviledges on the new catalog.
	(you can use a gui administrator or cmdline input similar to below.  Thanks Felix/Alex!)
	mysql -u root -p
	(log in with your root password)
	mysql>create database jukebox;
	mysql>use mysql;
	mysql>grant all privileges on jukebox.* to '[tcj_user]'@'localhost' identified by '[mypassword]';                 <-change[tcj_user] to database user name and [mypassword] to the password
	mysql>flush privileges;

    -copy lib/conf.php.default to lib/conf.php
    -open lib/conf.php in a text editor and enter in the user/pass,catalog and web path info as specified
    -open web browser and point to the web path.
    -Follow the prompts for the database updates and enter an admin user when prompted.
    -After all the updates are completed, click on the 'admin' section of the menu bar.
    -In the 'system config' tab, enter the path to your music directory (System file path to the main catalog directory) and hit the tab key to save it.  This is the directory on the server where your music lives.  It does NOT need to be visible in your www folders, but just accessable by your WWW server.
        This will also kick off the catalog update utility.  You may continue to set configs or browse the site while the catalog is updating.
    -Enjoy!
Wordpress Blogs
Make a backup of the database(s) from the OLD Server
From: http://codex.wordpress.org/WordPress_Backups
Simple Backup with phpMyAdmin
The following is a very simple version of how to use phpMyAdmin to back up your WordPress database. For more detailed information see WordPress Backups and Backing Up Your Database. Once you have discovered how to access your site's phpMyAdmin, follow these simple instructions.
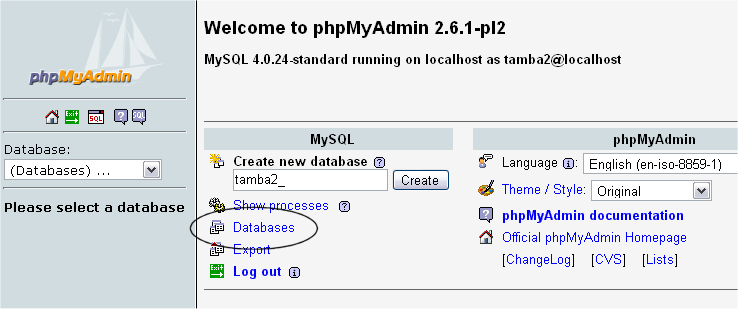
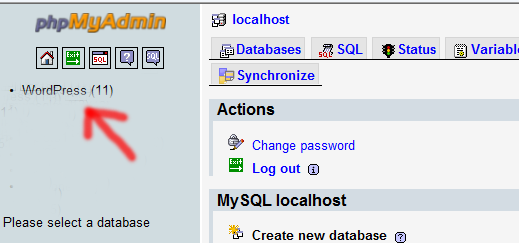
1. Begin by clicking database in your phpMyAdmin panel. (It may not be necessary to do this, depending on your version of PHPMyAdmin)
2. You may have several databases. Click the one that holds your WordPress data, the database you created when you installed WordPress. (In older versions this may be done through a pull-down menu.)
3. Below is a picture of the default tables in the Structure view tab. You may have more tables -- this would happen if you have any statistics plugins or anti-spam plugins.
4. Click "Export". (The next picture shows the Export tab view.)
- Select All the tables, and check the SQL radio button.
- Check the "Add DROP TABLE" box. (This can be useful for over-writing an existing database.)
- Check the "Add IF NOT EXISTS" check box. (This prevents errors during restores if the tables are already there.) You can optionally check the "Complete inserts" box. (Though it won't matter too much if you don't.) You can optionally check the Extended Inserts if you wish. (This gives a smaller, but less readable, output file.)
- Check the "Save as File" box
- Check the "None" for compression. If your database is very large use a compression method.
- Click Go. The data will now be saved into your computer.
5. Keep these files safe, copied and stored in separate places on separate media.
put the created file in the blogs public_html directory (temporarily)
use rsync to transfer everything in the blogs' public_html directory to the new server
Loginto phpmyadmin and add the database name to mysql
select the new database
import the saved file into the database
Now make a user name and password for the new database
while still in phpmyadmin
add user via the following steps
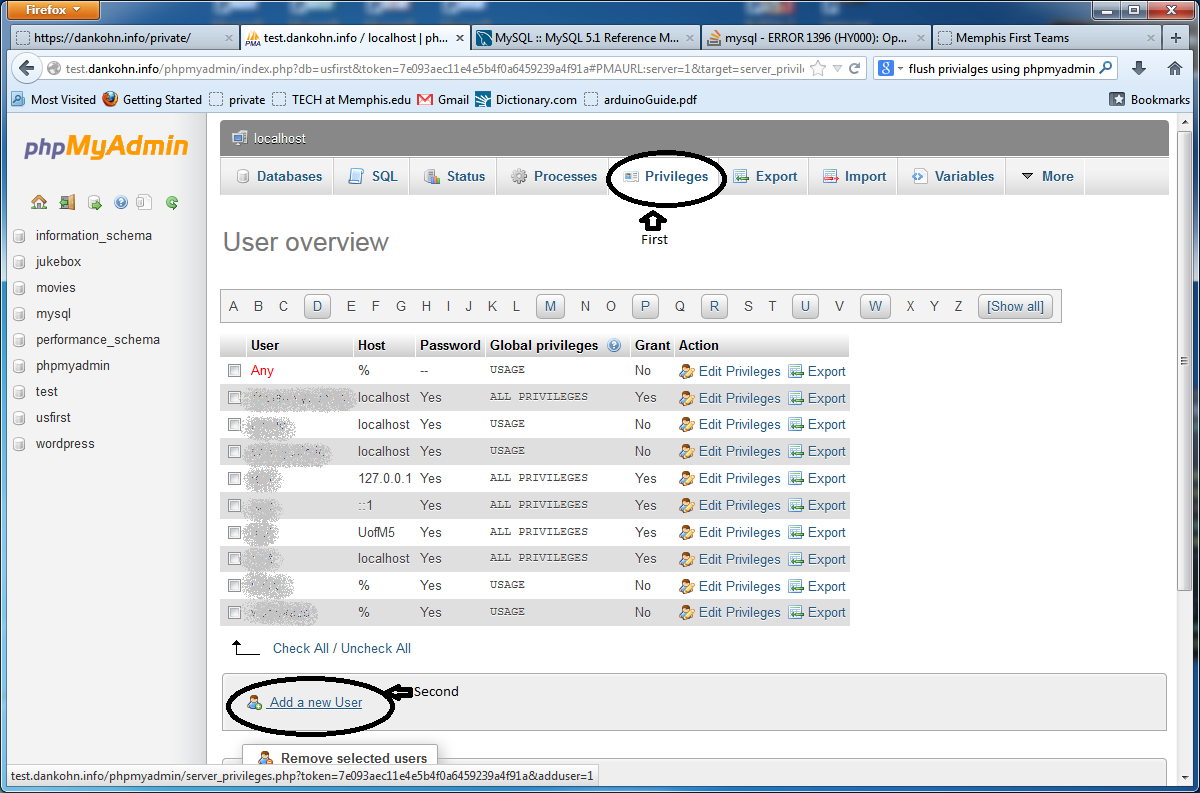
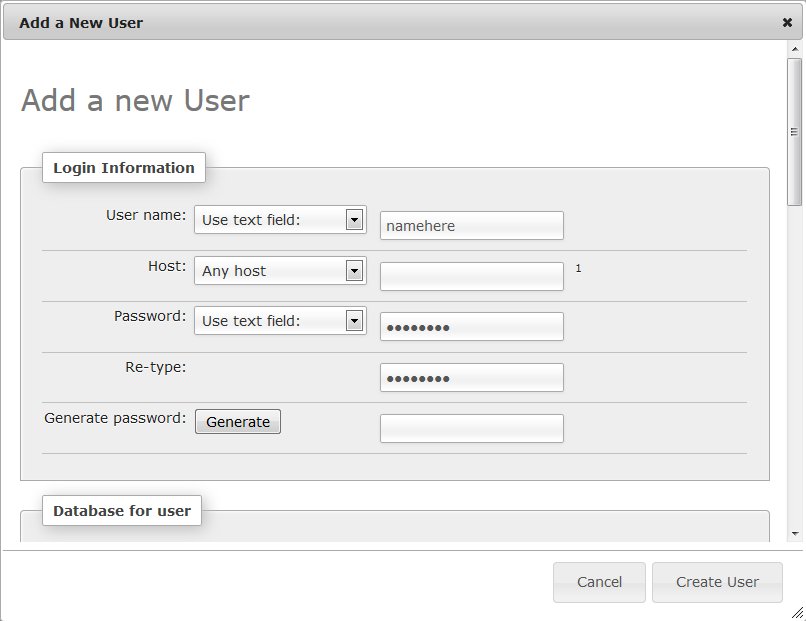
and press create user (no need to change any other parameters

now click on the "Edit Privileges" on the same line as the user name you just created
Select the database to link to this user
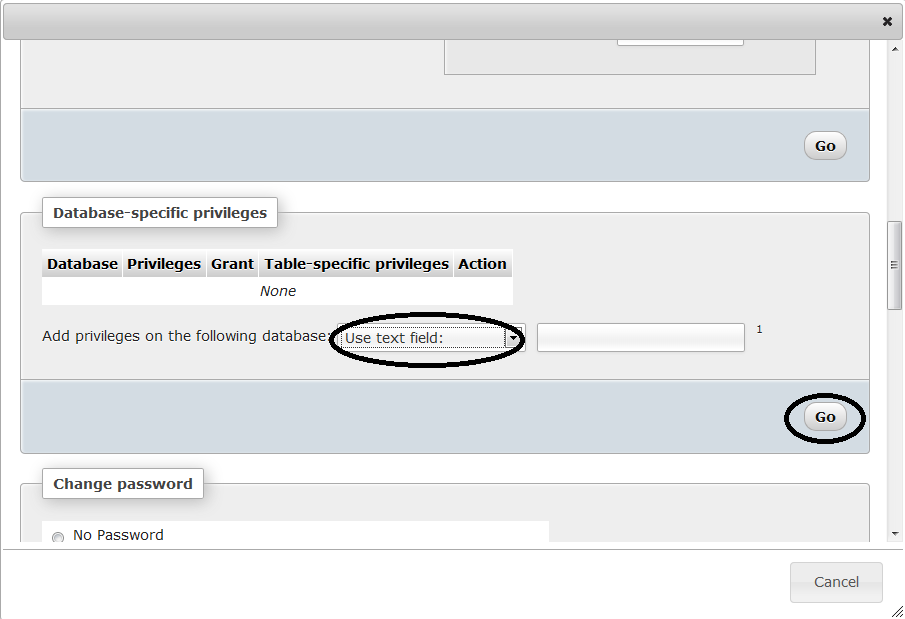
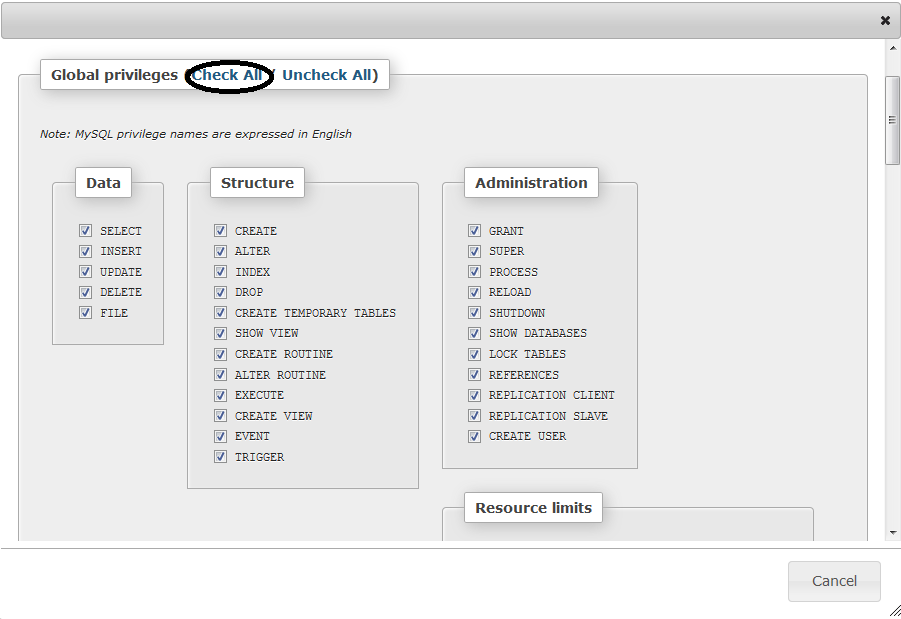
you will get a 2nd screen, but this is for data base permissions
do a SELECT ALL, then press the GO button to finish (do not select table(s))
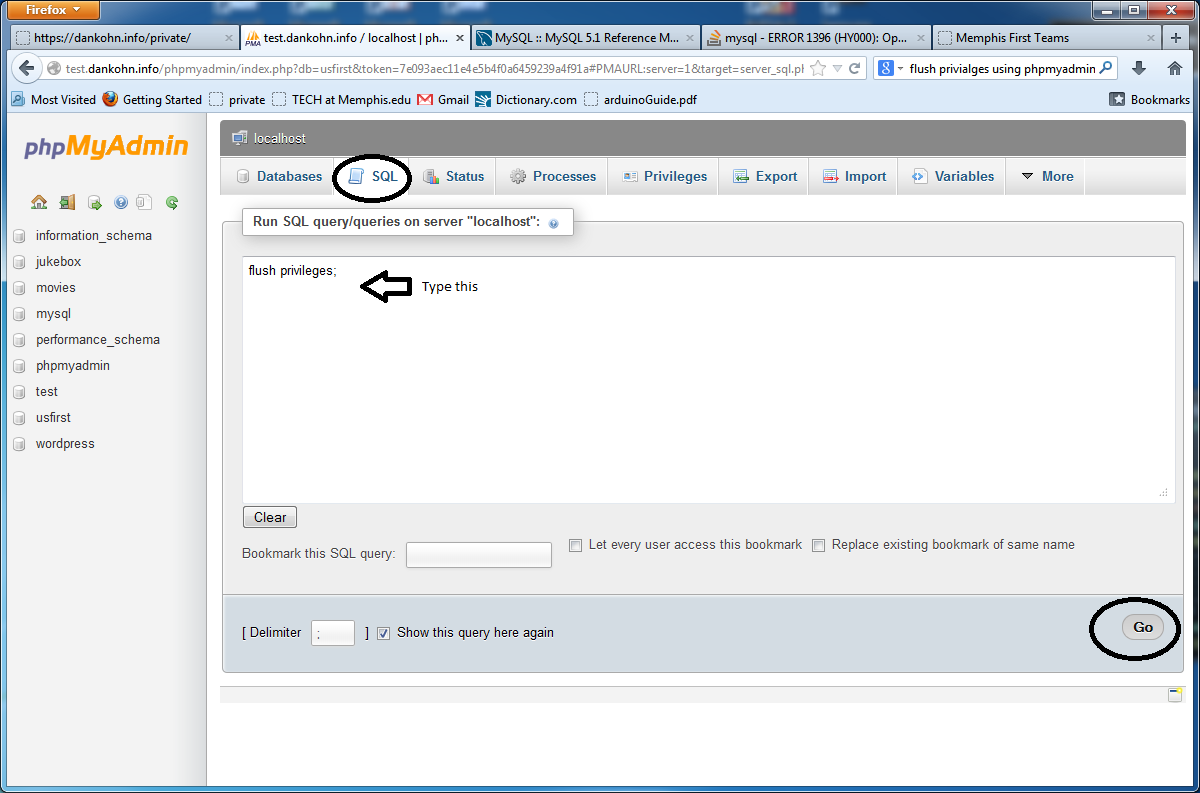
If you make a mistake, you can erase the user and start over, but you must do a flush first:
Select SQL tab and type in flush privileges;
Install Problems and Resolutions
/home/myhome/public_html/private/arduino_read would not run. Had to recompile using gcc arduino_read.c -o arduino_read before it would run. (maybe due to 32 bit to 64 bit upgrade)
Got an error when trying the x10 home automation website. Error read "Call-time pass by reference has been removed....". Edited line 11 from exec($cmd,&$output) removing the &
Had to change path to Video directory in video scripts
Got messages in video scripts stating This Program [ffmpeg] is depreciated - use avconv instead
In the video script, changed exec("ffmpeg -t 120 -i 'http://ip:port/videostream.asf?user=x&pwd=x' -an -target vcd /home/uofm/Videos/Security/kitchen_$today\_$test.avi"); to exec("avconv -i 'http://ip:port/videostream.asf?user=x&pwd=x' -t 120 -vcodec msmpeg4 /home/uofm/Videos/Security/kitchen_$today\_$test.avi"); This also seems to have fixed previous issues with storing the audio with the video.
Fieldpoint module project - it seems it will not work on the 64bit install, the FieldTalk™ library is only a 32 bit library. There is some indication that I can make it compatible using the ia32-libs libraries, but when I go to install the library it fails. See HERE for possible alternative.
libmodbus
Found libmodbus a Modbus library for Linux.
installed packages libmodbus-dev and libmodbus5
directories of interest:
/usr/include/modbus
/usr/share/doc/libmodbus-dev/examples
/usr/lib/libmodbus.so
To Compile code
gcc -I /usr/include/modbus/ filename.c -o filename -lmodbus
NOTES: Code defaults the TCP port to 1502 but the FieldPoint Module is port 502
Found this library very easy to use and to get working once I saw the libmodbus routine documentation
More info
libmodbus
GitHub libmodbus
jpgraph
jpgraph installed on the system was an old, limited version
to correct, the following was done:
First, download the latest version of jpgraph from HERE (for this install it was jpgraph-3.5.0b1.tar.gz)
copy or move the file from the download directory to /usr/share
do a cd /usr/share
untar file with tar -xzvf jpgraph-3.5.0b1.tar.gz
delete the original tar file
Do not uninstall the other version of jpgraph, instead, just do a mv jpgraph jpgraph.old
now create a symbolic link to the new jpgraph by using the command ln -s jpgraph-3.5.0b1 jpgraph
now create an access point to jpgraph:
from /home/myhome/public_html/private:
create a symbolic link: ln -s /usr/share/jpgraph jpgraph
to get to docs: http://dankohn.info/private/jpgraph/docs
to get to examples: http://dankohn.info/private/jpgraph/src/Examples
For some reason, there is a index.html in the Examples Directory that is NOT an index. I moved it to index.old
but still not done, had to edit all the old jpgraph scripts to include the full path name to the jpgraph .php files - full path is /usr/share/jpgraph/src/
Real Location of files:
Document files:
/usr/share/jpgraph-3.5.0b1/docs
Scripts:
/usr/share/jpgraph-3.5.0b1/src
Examples:
/usr/share/jpgraph-3.5.0b1/src/Examples
Did get JPgraph Error 25128 after finishing. Found THIS WEBSITE that stated:
To fix the problem, edit file gd_image.inc.php inside JpGraph folder, and disable the line start with JpGraphError::RaiseL(25128); in function SetAntiAliasing:

function SetAntiAliasing($aFlg=true) {
$this->use_anti_aliasing = $aFlg;
if( function_exists('imageantialias') ) {
imageantialias($this->img,$aFlg);
}
else {
   //JpGraphError::RaiseL(25128);//('The function imageantialias() is not available in your PHP installation. Use the GD version that comes with PHP and not the standalone version.')
}
}
Fixed the issue (still has issues with some True Type Fonts, but most graphs work).
Automatic Backups
create /archive directory on new system
copy *.sh files from /archive on old system to the new system using rsync
copy other.backup from old system to the new system using rsync
add the following lines to /etc/crontab on new system:
00 2 * * 6 root sh /archive/homebackup.sh
15 2 * * 0 root sh /archive/mysqlbackup.sh
00 2 * * 1 root sh /archive/critical.sh
00 2 * * 2 root sh /archive/uofmbackup.sh
00 2 * * 3 root sh /archive/usfirstbackup.sh
Print Server
Cups was installed with the OS, so, on the server, open a browser and go to https://localhost:631/
Go to Administration Tab
Add Printer
Select local printer - LPT1
Add printer (with the following settings)
Name: HP_LaserJet_1300 (underlines required)
Description: HP LaserJet 1300
Location: (Leave blank)
Share this printer (check mark)
Make: HP
Model: HP LaserJet 1300 - Gutenprint v5.2.6
Now goto the Printers tab and select from the Administration pulldown: Set as Server Default
Now on the Administration tab check the box by Share Printers Connected to this System
Win 7 Printer Setup to use CUPS Server
Select Devices and Printers from start menu
Add a Printer
Add a network, wireless or Bluetooth Printer
Stop - then select "the printer that I want wasn't listed
Select a shared printer by name
type - http://xxx.xxx.xxx.xxx:631/printers/[printer name] - printer name from CUPS - add printer settings above
Proceed with normal printer install
for the HP LaserJet 1300 I use the HP LaserJet 2200 Series PCL 5 printer driver
Creating Application Launcher in GNOME3 Desktop
from: http://community.linuxmint.com/tutorial/view/791
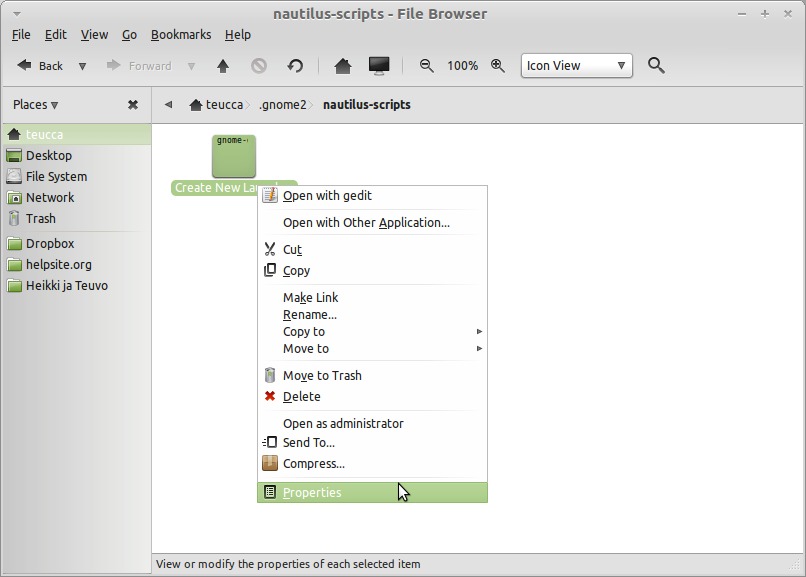
Go to nautilus-scripts directory from your home folder (~/.gnome2/nautilus-scripts) and create a new document called "Create New Launcher".

Open the file using a text editor like GEdit and type the following commands, then save it.
gnome-desktop-item-edit ~/Desktop --create-new
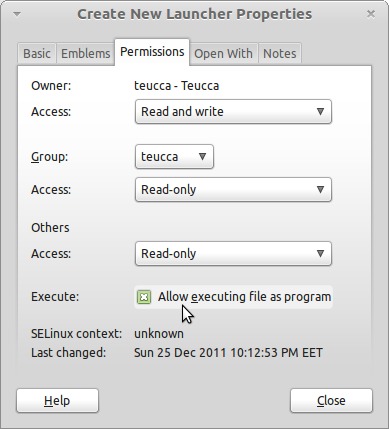
Open the file property
Go to Permissions tab and check "Allow executing file as program", then click Close button.
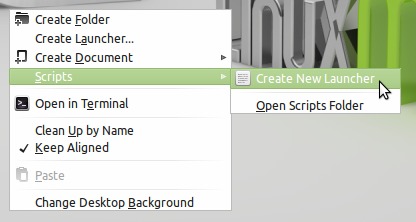
The launcher is now ready. To use the launcher, right-click from desktop and select
Scripts --> Create New Launcher
Raid Instructions and notes
raid status
cat /proc/mdstat
watch cat /proc/mdstat shows continual updates (useful when rebuilding raid)
madam --detail /dev/mdx
Typical output
cat /proc/mdstat
Personalities : [raid1]
md2 : active raid1 sda3[2] sdb3[1]
      1951333184 blocks super 1.2 [2/2] [UU]

md1 : active raid1 sda2[0] sdb2[1]
      1951680 blocks super 1.2 [2/2] [UU]

md0 : active raid1 sda1[2] sdb1[1]
      96128 blocks super 1.2 [2/2] [UU]

unused devices:
Explanation - md0, md1 and md2 are the three raid(ed) partitions. Each uses sections of disks sda and sdb (the two sata drives). The [UU] indicates both disks are UP (ie have a good copy). If you see a [_U] that indicates that the "a" disk is down. A [U_] indicates disk "b" is down.
The mdadm command not only shows status, but is also used to remove a disk from the raid (-r), add a disk to the raid (-a).
eg mdadm /dev/md0 -r /dev/sda0 will remove the sata 'a' drive from the md0 array
eg mdadm /dev/md0 -a /dev/sda0 will add the sata 'a' drive to the md0 array (and start the rebuild process)
See man mdadm for more details.
Installation of Debian Jessie (8)
July 2015
Why the install?
Lessons learned - the software raid did its job when the primary drive failed, but the secondary drive did not have GRUB because I never copied it over to the secondary drive when that failed previously so the drive would not boot. Was able to recover all the data from the array secondary drive, so no data was lost, but no matter what I tried I could not get it to boot. So it took 4 days to rebuild the system.
Koppix (ver7.4.1) the lifesaver - I have used Knoppix before, but this time I used it to recover the data from the secondary drive. Since the drive would not boot, I used knoppix to boot then did the following to reassemble the raid so I could access the drive to retrieve the backup files:
lsblk - command to show block devices (eg harddrive partitions) showed that the drive was there.
sudo mdadm -- assemble --run /dev/md0 /dev/sdx1
sudo mdadm -- assemble --run /dev/md1 /dev/sdx2
sudo mdadm -- assemble --run /dev/md2 /dev/sdx3
note: the x in sdx will be replaced by 'a' or 'b' depending on what disk in array failed
In the future, I will make sure to do the following when I replace a drive:
after the reboot / and swap [in my case] already is mounted from the RAID1 spanning both physical drives but i have to install manually grub on the 2nd drive so the system can boot even if the first disk is physically removed:
root@debian:~# grub-install /dev/sdb
Installation finished. No error reported.
Debian Jessie (8) install notes
The following are notable changes/modifications from the previous install. These notes are really for me, but I put them here since they might be of use to someone.
The install process was much as shown for 'Wheezy'. I did three partitions (/boot @ 300MB, swap @ 4GB and / (root) taking the rest of the 2TB) and did Gnome desktop, webserver, print server, SSH server and Standard system utillities check boxes.
Made sure to copy GRUB this time (see above).
After Install Notes
SSH mods
Found that SSH now defaults to not allow root login (about time) so that change was not nessisary.
Apache public_html access & setup
Tried to do the same as the last install. Added mods-enabled with no issues, but it did not like the old sites-available files. Found that in Apche2.2 (in Wheezy) to 2.4 (in Jessie), they changed some syntax in the file. The following is an excerpt from Upgrading to 2.4 from 2.2:

After runing for a day or two I discovered that apache was thowing all sorts of errors (7 GB log file!). An example of the error is below:
[Sun Jul 26 16:19:53.828078 2015] [access_compat:error] [pid 13882] [client 50.246.145.13:54594] AH01797: client denied by server configuration: /home/myhome/public_html/private/index.php
After researching, it appears that the errors are associated with .htaccess files created to password protect certain pages. The old files were as follows:
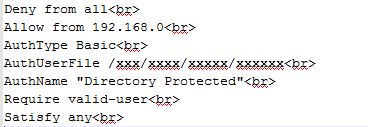
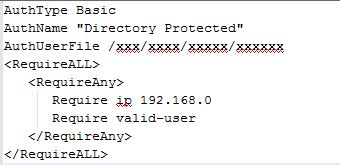
Found new syntax is as follows:
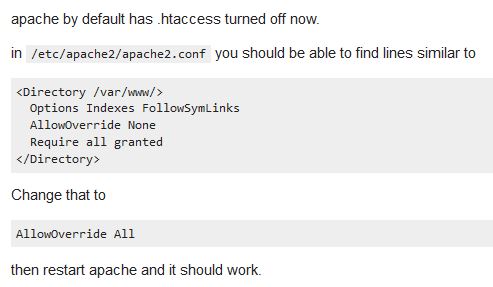
Also found that I could not get the .htaccess working for /var/www/webalizer directory (it was just ignoring it). Found a blog post that stated:
Secured phpmyadmin with procedure found here and copied below:
| |
How To Install and Secure phpMyAdmin on Ubuntu 12.04
Tags:
MySQL
Distribution:
Ubuntu
About phpMyAdmin
phpMyAdmin is an free web software to work with MySQL on the web—it provides a convenient visual front end to the MySQL capabilities.
Setup
The steps in this tutorial require the user to have root privileges on your virtual private server. You can see how to set that up here in steps 3 and 4.
Before working with phpMyAdmin you need to have LAMP installed on your server. If you don't have the Linux, Apache, MySQL, PHP stack on your server, you can find the tutorial for setting it up here.
Once you have the user and required software, you can start installing phpMyAdmin on your VPS!
Install phpMyAdmin
The easiest way to install phpmyadmin is through apt-get:
sudo apt-get install phpmyadmin apache2-utils
During the installation, phpMyAdmin will walk you through a basic configuration. Once the process starts up, follow these steps:
- Select Apache2 for the server
- Choose YES when asked about whether to Configure the database for phpmyadmin with dbconfig-common
- Enter your MySQL password when prompted
- Enter the password that you want to use to log into phpmyadmin
After the installation has completed, add phpmyadmin to the apache configuration.
sudo nano /etc/apache2/apache2.conf
Add the phpmyadmin config to the file.
Include /etc/phpmyadmin/apache.conf
Restart apache:
sudo service apache2 restart
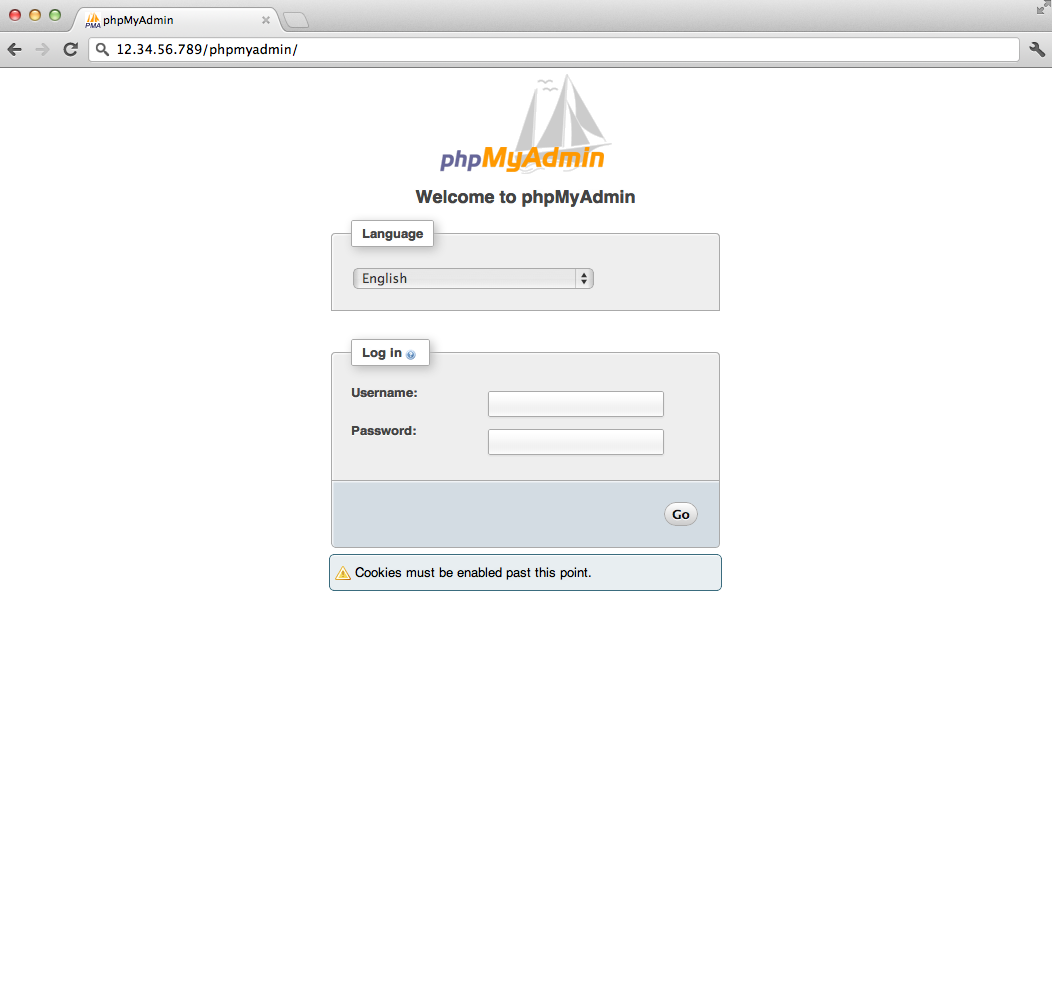
You can then access phpmyadmin by going to youripaddress/phpmyadmin. The screen should look like this
Security
Unfortunately older versions of phpMyAdmin have had serious security vulnerabilities including allowing remote users to eventually exploit root on the underlying virtual private server. One can prevent a majority of these attacks through a simple process: locking down the entire directory with Apache's native user/password restrictions which will prevent these remote users from even attempting to exploit older versions of phpMyAdmin.
Set Up the .htaccess File
To set this up start off by allowing the .htaccess file to work within the phpmyadmin directory. You can accomplish this in the phpmyadmin configuration file:
sudo nano /etc/phpmyadmin/apache.conf
Under the directory section, add the line “AllowOverride All” under “Directory Index”, making the section look like this:
<Directory /usr/share/phpmyadmin>
        Options FollowSymLinks
        DirectoryIndex index.php
        AllowOverride All
        [...]
Configure the .htaccess file
With the .htaccess file allowed, we can proceed to set up a native user whose login would be required to even access the phpmyadmin login page.
Start by creating the .htaccess page in the phpmyadmin directory:
sudo nano /usr/share/phpmyadmin/.htaccess
Follow up by setting up the user authorization within .htaccess file. Copy and paste the following text in:
AuthType Basic
AuthName "Restricted Files"
AuthUserFile /etc/apache2/.phpmyadmin.htpasswd
Require valid-user
Below you’ll see a quick explanation of each line
- AuthType: This refers to the type of authentication that will be used to the check the passwords. The passwords are checked via HTTP and the keyword Basic should not be changed.
- AuthName: This is text that will be displayed at the password prompt. You can put anything here.
- AuthUserFile: This line designates the server path to the password file (which we will create in the next step.)
- Require valid-user: This line tells the .htaccess file that only users defined in the password file can access the phpMyAdmin login screen.
Create the htpasswd file
Now we will go ahead and create the valid user information.
Start by creating a htpasswd file. Use the htpasswd command, and place the file in a directory of your choice as long as it is not accessible from a browser. Although you can name the password file whatever you prefer, the convention is to name it .htpasswd.
sudo htpasswd -c /etc/apache2/.phpmyadmin.htpasswd username
A prompt will ask you to provide and confirm your password.
Once the username and passwords pair are saved you can see that the password is encrypted in the file.
Finish up by restarting apache:
sudo service apache2 restart
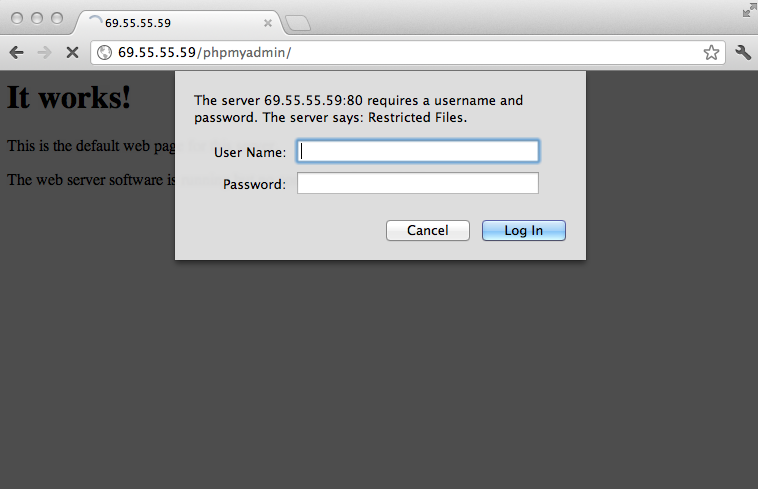
Accessing phpMyAdmin
phpMyAdmin will now be much more secure since only authorized users will be able to reach the login page. Accessing youripaddress/phpmyadmin should display a screen like this.
Fill it in with the username and password that you generated. After you login you can access phpmyadmin with the MySQL username and password.
By Etel Sverdlov
|
There are still other errors to investigate (probably due to other changes in Apache 2.4, ******more to come*********
Additional Software
Skipped Folding@home install (since I switched to BOINC - Berkeley Open Infrastructure for Network Computing back in Oct 2014). Installed that one instead.
Not doing Cisco experiments anymore so I did not bother installing atftp or atftpd
Found I had to install PHP5-MYSQL on top of other stuff
JPGraph ver 1.5.2-12.1 was what was in the installer library, but I installed jpgraph-3.5.0b1 from JpGraph website.
Had the same error as the last install....saying The function imageantialias() is not available in your PHP installation. Use the GD version that comes with PHP and not the standalone version. but found THIS WEBSITE with the exact fix I needed. They said:
Don't worry. Open the file [/usr/share/jpgraph/src/gd_image.inc.php], find the function SetAntiAliasing and comment this line out like this:
// JpGraphError::RaiseL(25128);//('The function imageantialias() is not available in your PHP installation. Use the GD version that comes with PHP and not the standalone version.')
Fixed it no problem.
Did also have an issue getting the symbolic link to the examples and docs to work. Had to do it in the account associated with directory (I was trying to do it as root). Once I switched users and did the symbloic link, the link to the page (in apache) worked.
Installed webalizer (been using it for EVER), but this time, it did not put in the update into crontab for me. Had to add it manually.
Networking
Set up static IP
Modifying the /etc/network/interfaces file did NOT work. Had to configure the static IP address and DNS vi the gui network utilities.
Gradewatch Setup
Had issues with Gradewatch on this system. Kept on getting errors:
[cgi:error] [pid 2190] [client 50.246.145.13:60873] AH01215: perl: ifconf.h:45: PROTO_ADDRESS_SIZE: Assertion `proto == 2 || proto == 10' failed., referer: http://tech-uofm.info/cgi-bin/gr_login.pl
Tried everything that everyone said on the internet, but nothing worked, but then I narrowed down what was causing the error by moving the exit(0); line around in the code. Found that the line:
$IPADDR = ip2name($IPADDR)."/".$IPADDR;
was causing the issue. Also determined that it was part of the logging for the gradewatch system, and I didn't care about getting the name associated with the IP, so I just remarked it out with a #...it worked!
Other
After setting up ssmtp (email sender), I kept getting errors via email stating "/etc/cron.daily/logrotate//etc/cron.daily/logrotate:
error: error running shared postrotate script for '/var/log/mysql.log /var/log/mysql/mysql.log /var/log/mysql/mysql-slow.log /var/log/mysql/error.log '
run-parts: /etc/cron.daily/logrotate exited with return code 1"
Found this website that explained that:
The trouble is, when migrating DB snapshots from a different server, the password stored in that config file no longer matches the one saved in the DB (as it was copied along with the data). Fixing this is easy: either fix the password in the file, or better yet, fix the password stored in the DB to match the random generated one (this way you have different passwords on each server).
Executed his fix:
echo "SET PASSWORD FOR 'debian-sys-maint'@'localhost' = PASSWORD('`sudo cat /etc/mysql/debian.cnf | grep password | head -n 1 |
awk -F= '{ gsub(/[ \t]+/, "", $2); print $2 }'`');" | mysql -u root -p

