![[Previous (Tournament Structure)]](SECON 1999 Hardware Contest How to Buil A Sales Pavilion_files/previous-fancy.gif)
![[Home]](SECON 1999 Hardware Contest How to Buil A Sales Pavilion_files/home-fancy.gif)
IEEE SouthEastCON 1999
Hardware Design Contest
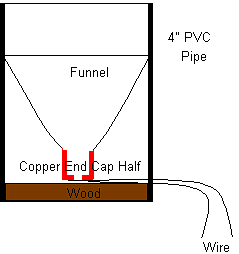
The sales pavilion is a five inch tall pipe with a wooden disk (used for mounting on the game board) in the bottom. Inside is a funnel to force a half (1/2) inch ball bearing to close a homemade switch. The poles of the switch are two halves of a copper end cap cut and separated by an air gap. When a ball bearing is placed, dropped or otherwise coerced into the top of the pavilion, current will travel through the closed switch.
| Materials List |
Materials List
| Instructions |
Cut the 4" PVC Pipe to a length of 5".
Sand pipe with fine grit sand paper until all sheen is removed from the PVC pipe. Protect the inside from over spray using rolled up poster board.
Paint the PVC pipe with Wal-Mart's wonderful ColorPlace Rust Control Spray Enamel. Use color 21004, Flat Black. Use several light coats instead of one heavy one. Cover all out side surfaces including the top rim. Dries tack-free in 30 minutes or less.
Insert the neck of the bottle into the pipe. Using a felt tip marker, mark a line around the bottle where the bottle meets the pipe. Cut the bottle on the fat side (or the side nearest the bottom) if the line. The result is a funnel that fits snugly into the pipe. (It is also useful during automotive oil changes.)

Cut the 1/2" copper end cap into 2 equal halves. Using needle-nosed pliers grip the half-cap by the end and flex the wall away from the cut edge with a finger, resulting in a downward slope toward the cut edge.
Drill a 5/64" hole through the end of the cap opposite the cut edge. Solder an 8" length of wire to cap using the hole. Solder both sides. Repeat for the other end cap.
Drill a 5/32" hole in the center of the bottle top.
Epoxy half of the end cap to the inside wall of the neck of the bottle. Epoxy the other half to the opposite wall of the neck, leaving a gap between the two halves.
Thread the wires through the hole in bottle top and replace top on the neck of the bottle. Twist the wire into one strand. Caution: Let the epoxy dry to avoid breaking the rackin' frackin' end caps free from the bottle.
From the 1 x 6 pine board cut a 4" disk that will fit perfectly into the end of the pipe. Suggestion: Use a 1" section of pipe as a template.
Drill a 5/64" hole 3/8" from the edge on opposite sides of the pipe. Insert the disk into the pipe and fasten with the brass screws.
Above one of the holes drill a 5/32" hole 1 inch from the edge. Thread the wires through the hole while positioning the funnel inside the pipe. Ideally, the neck will be perfectly centered. Spread epoxy around the top of the funnel to secure it firmly in the pipe.
Snap the dual mini board into two single mini boards. Score the board down the fourth row of holes with a knife and snap into a Slim Jim, er, I mean snap along scored line. This results in a 1 3/4" X 3/4" mini board with three rows of holes.
Place the LED on the board with the anode in the second hole of the middle row of holes. Solder in place. Three holes down from the cathode, solder the 10 ohm resistor in place.
Connect the cathode of the LED to the first lead of the resistor.
Connect a 12" length of 22 gauge wire to the anode of the LED. Connect a 12" length of 22 gauge wire to the trailing lead of the resistor.
Place the PVC pipe with the wires facing toward you. Turn the pipe 1/4 turn clockwise and mark 4" from the bottom. This is the position for the LED.
Cut two 1/4" lengths of drinking straw.
Insert a screw into the boards mounting hole and slip the length of straw over the screw. Attach the board to the face of the pavilion with the LED at the 4" position facing away from the pavilion. Tighten until the straw begins to bend.
written by Ben Jones...